Tuesday, October 18, 2016

Seat Handle


My Freestyle came with a broken seat recliner handle. The seat has motors to move it fore and aft, but reclining the seat is a manual affair in my trim level and the handle that did this was broken.  The recline of the seat was a bit more than I would have liked, I could have lived with it had I no choice, but I did have a spare $17 to put into additional driver comfort.

This seemed to be an easy fix -- get a new handle, push onto axle, call it a day.  Getting the new handle was the slightly more expensive than anticipated, as I couldn't find an after-market part via mail order that I knew would fit.  Even "hassle free" mail order returns seem to have some level of hassle.  

I would need to contact a Ford parts dealer, so I used my standby Tasca Auto Parts. Plugged in my VIN and a few clicks later, my order was placed.  A few days later, the part arrived at my door and I was even surprised the color matched.  Must have been color information encoded in the VIN, as I didn't make a color selection when picking the part.  I wouldn't have fussed about the color as long as it worked, but it's nice that it matches.

Worth noting that bag says "Majority Content made in USA".  Considering the bag contains one plastic, injection moulded part, I'm wondering what minority content was from outside the good-ol-USA.  This wording was probably carefully selected as a result several meetings at the legal department whose job it was to approve what appears on product packaging.


Here's the old and new parts.  The part broke in a predictable place given how it's used.  Installation was super easy, line-up the handle so the key was oriented correctly and press.  That's it.  I'm now much more comfy as I head down the road.

Tuesday, October 4, 2016

Aww, Snap!

So, my accessory belt broke again.  The first time the belt broke, I wrote the problem off to possibly the age of the belt.  It didn't seem unreasonable that the belt was not replaced recently considering the overall poor maintenance of the Freestyle.  When I replaced the belt, I didn't determine the root cause of the failure, I fixed the symptom, or second-order problem.

Belts fail due to the following reasons, and primarily the first two
  1. Age
    They're rubber + nylon, so after a while, the rubber and/or reinforcing material breaks down, causing the belt to come apart.  Belts in this state can be described as "crispy" as the rubber looses pliability.
  2. Pulley Problems
    The belt rides over a number of pulleys to transmit the force of the crankshaft to other components.  Problems such as poor alignment, wiggling (float), or a stuck (frozen) pulley will break a belt.
  3. Obstruction
    Stick + belt = broken. This is unlikely, but so is winning the lottery, and there's probably hundreds of lottery winners every day.

Proper Diagnosis

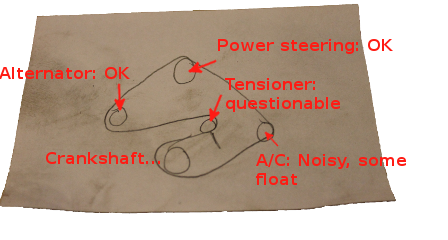
In my case, since the belt was new, #1 was ruled out, but number 2, well that's probably the problem.  I checked the pulleys before replacement, here's my findings:

Annotated Belt Diagram
The tensioner pulley was as stiffer than an old man's back and the AC pulley was noisy and presented some float.  Float, in this sense, is when a pulley moves perpendicular with respect to its axle.  I decided to take a chance a replace the tensioner: firstly, it was cheap (sub $10) and considering it looked the age of the car, I wasn't surprised it wasn't rolling quietly and smoothly.  The next possible problem would be the A/C pulley, the float causing the belt to be incorrectly aligned and come-off the pulley, but that would be considerably more expensive, so lets start with the cheap fixes first. 

Replacing the Tensioner Pulley

Lots of room to remove part
I put the car up and removed the inner wheel lining to get easy access to the tensioner, held to the engine with one 13mm bolt.  I was expecting a struggle, with a very tight bolt, affixed with a double-dose of blue Lock-tite.  A good pull on the ratchet and that was it! I removed the rest of the bolt with my fingers -- almost too easy.  The part then just fell off into my waiting hands.
There's two other pegs (circled) on the tensioner to hold it in place, once mounted to the engine. This is neat design in that the tension cannot be incorrectly mounted and, at the same time, can be held in place with just one bolt, saving assembly time. 

As with the rest of the engine bay, the part was covered in oil.  I'm sure that I'm leaking from the valve covers, and/or the cover over the timing chain and/or the camshaft seals.  More leaks than an onion farm.  As long as I don't have a puddle in my driveway, that's a problem for a different day.


New (l) and Old (r)
Once off the car, I cleaned the existing part, removed the old pulley by removing the 8mm bolt and swapping parts.  My new part included a small adaptor for applications where the part rested on a smaller axle. I'm guessing this part works on umpteen different cars and the cost of a little ferrule in every box is cheaper than maintaining two different SKUs.
Reassembled and much cleaner

Re-assembled and the part was ready for re-installation.  Considering how easy this change was to do, I should have done it when replacing the belt the first time around. 

I'm happy that I took pictures as I went along, as I didn't know in which direction to install the new pulley -- but since I had a picture of the part right after removal, knowing what to do was easy.

Rattling Continued until it Stopped

Installed the belt, nothing notable there.  Fired-up the engine and it ran just fine.  But the A/C pulley was still rattling.  Figured this was OK, drove the car for about a week and the A/C pulley became louder, developing into a legitimate, full-blown racket.  The noise finally went away when the replacement belt broke, so I know what needs to be done to fix the root cause of the problem.  I've never done any work on an A/C system, so this should be a learning experience. 

Sunday, September 25, 2016

Disappering Coolant: Fixed!

My testing harness for dashboard warnings lights, which, incidentally can be used for transportation, presented me with a coolant low light.  And, in fact, the coolant was low, so the sensor was accurate.  (I've always been a little frustrated when the first response to an irregular reading from a sensor is to replace the sensor itself rather than the problems being reported by the sensor.) The next question was, where was it going?  A little investigation revealed it was leaking out of a pipe that ran along the bottom of the radiator, connecting the overflow tank to the radiator and pump.  This was less of a mechanical problem and more of a plumbing problem.

I was disappointed in myself because I saw this dodgy pipe while fixing the water pump and thought to myself: "If it's not broke, don't fix it" and just because it looked dodgy didn't mean it actually was dodgy.  I'm guessing that once the system was running at proper pressure, a weakness in the pipe developed into a leak.  Mechanical systems seem to wear as an entire system, so replacing a part exacerbates the wear in others.  After replacing this pipe, the next-weakest part of the pressurized cooling system are the hoses, then radiator and then the engine block itself.

Locating the part itself was a bit of a hassle.  It was only available directly from Ford -- but when you order from Ford you effectively get overnight delivery to a Ford dealer and it so happens there's one just on my way to work.

Out with the Old

Fixing things was straight forward.  I drove the car up onto ramps, no need to lift using a jack and place jack stands.  Drained the radiator into a bucket from the petcock and found my second Imperial fitting on the car a 1/2inch plastic nut serving as the valve for the petcock, gave it a turn and I didn't get that much coolant.  I could still feel the liquid in the other side of the tube so I'll be ready to catch the coolant when I remove the rubber hose. Curiously, I replaced my dishwasher the week before, all of the fittings, hoses, nuts, bolts were Imperial as well.  Maybe the Crown has a lock on plumbing fixtures as well as socket ends?

Francis X. Clampazzo
To do this job, I got a new toy^Wtool. It's a tool specifically designed to open the clamps on radiator hoses.  It was about $18 on Amazon and a bargain at twice the price.  I figured I would need to remove and replace at least six clamps, and some were not easily reachable.  Having the wired extension made removing the clamps easy in that it was able to open them enough to have the stop tab keep them open.  After opening the clamps, removing the hoses was remarkably hassle free. Without this tool, it would have been much more of a struggle.

With all of the clamps opened, I removed the lower hoses, careful to catch the coolant still retained in the system. About another gallon of coolant exited from the bottom of the radiator. Even with my fancy tool, I had trouble reaching the clamp on the lower hose, so I unhooked the oxygen sensor and pulled the pipe still attached to the coolant return hose upward, looking as though I disemboweled my Freestyle.  The last hose clip could now be reached with ease. 

Failed Clamp

Once out of the car, it was also clear that the section of the pipe closest to the water pump took the brunt rust damage.  When tried to remove the fitting around the hose with my tool, I noticed that is was nearly rusted in half and had adhered to to the rubber.  While I didn't
test, I would be surprised if this didn't hold the rubber to the pipe with enough pressure, resulting in yet another leak.  With very little effort I was able to pull the two parts of the clamp away. The nice straight seam in the metal was a bit odd in that I didn't see anything the fitting was resting upon to cause this indentation.

The pipe's integrity was greater than anticipated, as I expected the pipe to simply collapse into pieces, or fracture where they meet the rubber hoses.  Instead, I needed to scrape a little to find the problems: in two places the rust gave away to expose holes in the pipe.  For comparison, I've included a side-by-side picture of the old part and its replacement.

I'm going to guess enough metal remained to hold liquid at STP but not at running conditions.  With the system no longer leaking at the water pump, the system was under much more pressure than before, thus forcing the liquid out while the car was running. The leaking had also corroded one of the hose clamps, reducing it's ability to hold under pressure as well.

I got everything taken apart and the clock struck eleven bells.  Being a work night, I decided to clean-up and get ready for bed.  I was working in garage and it was a warm evening, so I decided to leave the door open and I pushed the bucket of coolant under the car so the cats wouldn't be tempted to imbibe and it would be out of reach of the kids (worried about them kicking it over), as coolant can be re-used.

In with the New

The next day, a little bit of dish soap on the ends and I "test fit" everything back together again, putting a little soap on the ends to make adjustments easier: 
Auto repair isn't my forte (if you've been reading the blog, that's painfully obvious) but plumbing...  I've done enough plumbing to not make the obvious mistakes.  The process of test fitting lets you understand how sets of fittings will work together before actually welding/sweating them into place, making it easy to fix problems.  In the illustration, I've circled the two fittings I needed to turn the other direction so I could reach the bolt head to tighten them.  Here's what it looked like once in the car and I realized I needed to flip things around:

The air filter housing blocked access to the hose going into the water pump, so I removed the 8mm bolt and pulled it from its rubber grommets.  With that out of the way, I reattached the water pump hose, radiator hose, and return hose -- the soap making it easy to position the rubber hoses.  Just like the dishwasher I installed earlier, I "test fit" all of the connections before clamping them into place.  This works so much better than tightening fittings "as you go" because mistakes can be fixed easily.  In my test fitting, I found that I put the bolt heads on the new clamps facing the wrong direction and I needed to twist the hose heading to the water pump about 90 degrees.  Once lined-up I tightened the various clamps (using an 8mm socket) to fix the replacement part into place.  The picture shows use of the hose clamp tool -- it was a real frustration and time saver.

Finishing-up!


It was now I reached for my used coolant and spied a frog, dead and floating about.  I'm pretty sure my cooling system didn't contain any frogs, so this unfortunate amphibian hopped in overnight and couldn't make its way back out again.  I've heard that coolant was supposed to taste good, so much there's an additive to make it less attractive tasting to kids, I wonder other animals can't taste the additive or maybe my garage attracts less fortunate frogs.

Makes you wonder about the prevalence and abundance of life -- it's simply everywhere.  I wonder what bigger livestock has made its way into my garage when the door is left open?  Given the sheer number of deer, raccoons, groundhogs, turkey, squirrels, mice, owls, small children, pheasant, snakes, dogs, and cats spotted in an average week wondering about the yard, I'm betting an open garage attracts more wildlife than I want to know.

Friday, September 9, 2016

State Inspection Complete

Quick update: State inspection is done, along with two tires and an alignment.  Total cost: $397.57, or about $100 shy of the cost of the car.

Here's how we got to that number:

- Two Mastercraft Tires: $215.18
- Installation (balance, disposal, tax): $18.00
- PA State Inspection: $32.00
- PA Emissions Inspection: $35.00
- Alignment: $75.00
- Governor’s Share: $22.39

The inspection was a mere $67.00, the rest of the bill being the tires and much- needed alignment after replacing the outer tie rods.  As you can see in the outer tie rod post, the front-end of my Freestyle sported poorly aligned, well worn, front tires.  These would have needed a replacement for inspection and during that time the shop would have (rightfully and I wouldn't have questioned, as I trust this mechanic) insisted on the tie rod replacement as well.

Mastercraft Tires

Cooper Tire makes the Mastercraft line, where Mastercraft is the "down-market" or discount brand.  Cooper Tire, based in Findlay, OH, due south on I-75 of Corporal Klinger's home town and Tony Packo's base of operations .  Cooper Tire, no longer a public company, was purchased by Apollo Tyres of Gurgaon, India. Despite foreign ownership, my tires were made in the US:


I've had Mastercraft tires on a few of my cars and haven't been all that impressed.  But they're inexpensive and I'm not sure how much longer my Freestyle will carry on, so I'm not sure if the additional tread life of a better tire would be a good bet. Tooling around on them, they ride quiet and the alignment has taken an uncomfortable shake out of the steering wheel and no more squealing as we go around corners at low speed.

Ugg, Marketing

Stay-Puft Michelin Man
The big question is, however, would I really come to the same conclusion about the subjective performance of the tires if they were labeled differently, or even the objective performance?  When somebody from the Marketing Department talks about a "product", it's not just thing itself (called the device), it's all of the advertising and how that information has been interpreted by the consumer and then applied to the device. 

Alf's edible cousin
I've never seen a Mastercraft commercial, so I don't know what to think about this brand, but I have seen lots of Michelin tire adverts.  Michelin tells me their product makes my car safer and that I should trust a cartoon character constructed from tires selling tires the same way I should trust an anthropometric animal selling me food, like a jolly Ameglian Major Cow.

Thinking back on my other tires from Mastercraft, even if they performed the same, would I held a differing opinion if I was primed to view the brand differently?  I feel better about the Continental tires on my VW (also US made), but I don't know if they're objectively better than any other brand. 

Tuesday, September 6, 2016

Disappearing Coolant

Coolant low light
I got a new light on the dash, this one for low coolant.  It seems like my car is the best test harness for warning light testing on the road today.

Checked the coolant reservoir and it was, in fact, empty, so at least I know the sensor's accurate.  But I didn't see a stream of coolant exiting the car.  The cooling system in a car is of the recirculating variety, so the coolant has just the following places to go:

1- Dripping out of the system
Maybe I did a poor job with the water pump and there's a leak.  But why am I not seeing a puddle of coolant?  Maybe the dripping is slow enough or it's making contact with something hot and evaporating?  But where's the steam? Could the leak be occurring at higher pressure, so when the car is stopped idling at slow speed, no leak?
2- Mixing with the fuel, going out the exhaust
This would be worse.  I'm not seeing the white smoke normally indicating this problem.  The oil looks good as well, this would be milky, as the water in the combustion chamber would mix with the oil causing it to look cloudy.  While I've never done a head gasket, this is the fix for this issue.

Better than out through the tail pipe
I went through about a gallon of coolant over a few hundred miles, each time, before filling, looking for a leak and I didn't see anything dripping.  Then, after a nice drive, I pulled into the driveway and found the coolant overflow reservoir yet again empty.  Looking down, my driveway revealed what was hidden to me so far: a nice deposit of fresh coolant.  Not much, so I know the leak is small, probably worse at speed, as this issue as cropped up as I've been taking the car out for progressively longer trips.

Not much of a leak, but enough...
The top of the engine around the water pump was dry, but under the car I see some drips from under the radiator support.  That's probably where we need to start looking.  When I purchased the car, the prior owner told me it was leaking from radiator, but this didn't seem to be a radiator leak, as this part was dry.

Corroded pipe
I filled coolant reservoir at the end of the day and the next morning it was empty.  There's a hose leading away from the reservoir and it joins with a metal "T" joint that looks to be in bad shape and leaking.  The T joint joins the overflow, bottom of the radiator and water pump inlet.  Why something that could corrode like metal?  The parts counter guy and I were discussing and we think it's due to the proximity to the exhaust manifold.  This makes sense.  The reason for using such an inferior material like regular steel probably boiled-down to cheapness on the part of Ford.

Here's a close-up from under the car.   I needed to remove the air dam, held in place by some 8mm bolts and those dastardly plastic screw rivets.  Once removed, I could get a clear line of sight on the problem.


The most leaking seems to be on the end of the pipe heading to the water pump, but the amount of moisture on the pipe itself seems to imply leaking from several spots or it has become porous.  I ordered a replacement (about $40 from FordParts.com, the "official" Ford site seemed to be the only place I could get this) and I should have things back together in a few days.