Showing posts with label cheap!. Show all posts

Saturday, February 10, 2018

Lift gate, minor issue, fixed!


Owning a cheap car means compromising with various things sort-of-but-not-entirely working.  You don't drive the car, you negotiate travel to your intended destination.  Anyway...

The lift-gate on my Freestyle was catching on the black, plastic trim.  The work-around was to push down on the trim when opening the lift gate to avoid the extra bit of effort needed to overpower the bit of plastic interfering with the operation of the rear lift-gate.

Not a big problem, but enough of a problem for me to spend 15 minutes to fix it.  Repair involved removing the panel, cleaning away the dirt caught underneath, fixing the fastener so the trim stayed seated and putting the trim back.

Friday, January 26, 2018

New fuel filter


Probably the original
While the car was in the garage getting exhaust work done, I figured why not change the fuel filter as well?  While I was at it, I ripped apart the old one to check its dirtiness -- turns out it was plenty dirty, but I'm not sure if a clean filter will make a difference in the overall operation of the car.

As the filter does its job, what it catches will reduce the flow rate through the filter, meaning the pump will need to work harder to provide the same amount of fuel as a clean filter, or the car will have figure out how to run with less gas that expected; in practice, both are probably happening.

Tuesday, March 14, 2017

P0171 and P0174, solved!

The CEL started to glow and the resulting error codes were P0171 and P0174 both mean that the engine is running lean, which means too much air and not enough gas.

Not being sure what the problem was, and starting with the "not enough gas" theory because, well, that just seemed a good place to start.  Up went the hood and the problem became a bit more obvious
The line from the brake booster, which is powered by the suction of the engine as it's taking in air (an engine behaves as an air pump) became disconnected and that resulted in more air making it past the throttle than the engine management system expected. 

Here's what things look like after proper assembly
Eighteen seconds later and my repair was finished.  Not having my phone handy, I used my old-timey OBD scanner tool to read the codes and then clear them from the system
The codes didn't return after 100 or so miles, so this was definitely the problem.  In anticipation of the problem being the fuel filter, I have a new one of those on hand, I'll post when I get to replacing the existing filter which appears to be old and in need of swapping with a new one.

Tuesday, February 21, 2017

Lift supports installed

Maximum package, minimum product
My new lift supports were purchased from RockAuto and shipped to me thusly.  Seems like a lot of box for not that much product.  Padding?  The padding was placed atop of the product, so it contributed to the protection of just 1/6 of the product's surface area.  The cardboard box did the rest of the work in terms of keeping things from arriving crushed.

Smurf entrails
Seeing such a wasteful way to ship products reminds me of how much it must cost to be more efficient.  Guessing that warehouse guys at RockAuto fulfilment have just a few sizes of boxes, stocking more would be more expensive than the waste of a 1/10th filled, but larger box.  RockAuto seems to be the greatest offender in the box to product waste, with Amazon being a close second.

Monday, October 31, 2016

Happy Halloween! Fixing the Fan Speed Control

Boo!
The Freestyle has passed an important milestone in my household.  Not in dollars spent or miles driven, something more substantial.  My wife likes the car enough to start decorating it.  At first, she refused to be a passenger, in fear of an immediate breakdown or immolation (I feel the need to point out I spelled that word correctly the first try), but after seeing it not stranding me the last few months, I think she's warming up to our newest car -- plus, I think it keeps me in the garage and out of her hair.  I'm told this car is "cooler" than our minivan; which I don't understand because our minivan has a TV.

Fan Control

I'm on to fixing the AC system and part of the job is fixing something that didn't work from day one of my ownership experience: the fan speed control.  The controls offered two options: nothing or high.  Not a big deal, maybe an annoyance at the most.  Once the AC has been recharged (I've replaced all of the parts, just recharging the system remains!) it will be nice to have some control; same for the heat in the looming winter.

Replacing the part was easy enough.  On the passenger's side, slide the seat all the way back to give yourself room to work.  Then, remove a panel covering the fan by pulling out two plastic rivets:

The part in question can be found close to the firewall and center console.  Remove the wiring connector, spin out the 8mm screws.  The part will just fall out.

There's not much clearance and I found the wiring kept getting in my way, I tucked it into the center console.  Insert the new part, making sure it's oriented with the connector release facing you, the connector has some pegs to ensure a correct fit -- there's two screws and two alignment pegs -- twist things back up to "hand tight" and that's about it.  The wiring connector will fit only one direction and returning the protective cover involves pushing the plastic retainers back into place. Done!

The malfunctioning fan is a common failure, the part at fault being the fan speed resistor, which regulates the amount of electricity to the fan, which then controls how fast the fan spins.  This this part works by restricting the flow of electricity, that extra energy become heat, explaining why this component can be found close to the fan it controls, as that provides some cooling.  In this part of the world, something hot will condense the moisture out of the air, which probably contributes to the part's demise.

Old part, note bubbling
Coating the part with some moisture-resistant material performs the important job of keeping wiring on the part from making contact in such a way a short-circuit occurs, which looks like what happened on the failed part.  Notice the bubbling close to the connector, it looks like some water worked its way under the coating; guessing the heating and cooling cycles resulted in the coating separating from the sub-strait thus spoiling the circuitry.

A Small Find

Found the Owner's Manual!
When I removed the panel covering the fan, out fell the original owner's manual for the car and a black Aldi job application.  I'm guessing the book fell from an overloaded glove compartment above.  For the first time I think ever, I needed to consult the owner's manual to find the neutral override switch and needed to use Ford's (excellent) on-line manual service.  While I might never look at it again, It's nice having the owner's manual for completeness's sake.  I'll give the job application to my youngest kid so nothing goes to waste.

Tuesday, October 18, 2016

Seat Handle


My Freestyle came with a broken seat recliner handle. The seat has motors to move it fore and aft, but reclining the seat is a manual affair in my trim level and the handle that did this was broken.  The recline of the seat was a bit more than I would have liked, I could have lived with it had I no choice, but I did have a spare $17 to put into additional driver comfort.

This seemed to be an easy fix -- get a new handle, push onto axle, call it a day.  Getting the new handle was the slightly more expensive than anticipated, as I couldn't find an after-market part via mail order that I knew would fit.  Even "hassle free" mail order returns seem to have some level of hassle.  

I would need to contact a Ford parts dealer, so I used my standby Tasca Auto Parts. Plugged in my VIN and a few clicks later, my order was placed.  A few days later, the part arrived at my door and I was even surprised the color matched.  Must have been color information encoded in the VIN, as I didn't make a color selection when picking the part.  I wouldn't have fussed about the color as long as it worked, but it's nice that it matches.

Worth noting that bag says "Majority Content made in USA".  Considering the bag contains one plastic, injection moulded part, I'm wondering what minority content was from outside the good-ol-USA.  This wording was probably carefully selected as a result several meetings at the legal department whose job it was to approve what appears on product packaging.


Here's the old and new parts.  The part broke in a predictable place given how it's used.  Installation was super easy, line-up the handle so the key was oriented correctly and press.  That's it.  I'm now much more comfy as I head down the road.

Tuesday, October 4, 2016

Aww, Snap!

So, my accessory belt broke again.  The first time the belt broke, I wrote the problem off to possibly the age of the belt.  It didn't seem unreasonable that the belt was not replaced recently considering the overall poor maintenance of the Freestyle.  When I replaced the belt, I didn't determine the root cause of the failure, I fixed the symptom, or second-order problem.

Belts fail due to the following reasons, and primarily the first two
  1. Age
    They're rubber + nylon, so after a while, the rubber and/or reinforcing material breaks down, causing the belt to come apart.  Belts in this state can be described as "crispy" as the rubber looses pliability.
  2. Pulley Problems
    The belt rides over a number of pulleys to transmit the force of the crankshaft to other components.  Problems such as poor alignment, wiggling (float), or a stuck (frozen) pulley will break a belt.
  3. Obstruction
    Stick + belt = broken. This is unlikely, but so is winning the lottery, and there's probably hundreds of lottery winners every day.

Proper Diagnosis

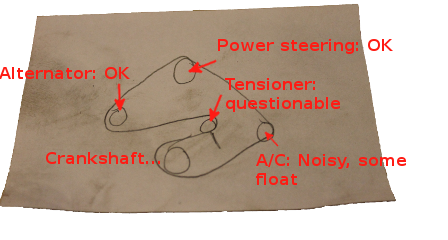
In my case, since the belt was new, #1 was ruled out, but number 2, well that's probably the problem.  I checked the pulleys before replacement, here's my findings:

Annotated Belt Diagram
The tensioner pulley was as stiffer than an old man's back and the AC pulley was noisy and presented some float.  Float, in this sense, is when a pulley moves perpendicular with respect to its axle.  I decided to take a chance a replace the tensioner: firstly, it was cheap (sub $10) and considering it looked the age of the car, I wasn't surprised it wasn't rolling quietly and smoothly.  The next possible problem would be the A/C pulley, the float causing the belt to be incorrectly aligned and come-off the pulley, but that would be considerably more expensive, so lets start with the cheap fixes first. 

Replacing the Tensioner Pulley

Lots of room to remove part
I put the car up and removed the inner wheel lining to get easy access to the tensioner, held to the engine with one 13mm bolt.  I was expecting a struggle, with a very tight bolt, affixed with a double-dose of blue Lock-tite.  A good pull on the ratchet and that was it! I removed the rest of the bolt with my fingers -- almost too easy.  The part then just fell off into my waiting hands.
There's two other pegs (circled) on the tensioner to hold it in place, once mounted to the engine. This is neat design in that the tension cannot be incorrectly mounted and, at the same time, can be held in place with just one bolt, saving assembly time. 

As with the rest of the engine bay, the part was covered in oil.  I'm sure that I'm leaking from the valve covers, and/or the cover over the timing chain and/or the camshaft seals.  More leaks than an onion farm.  As long as I don't have a puddle in my driveway, that's a problem for a different day.


New (l) and Old (r)
Once off the car, I cleaned the existing part, removed the old pulley by removing the 8mm bolt and swapping parts.  My new part included a small adaptor for applications where the part rested on a smaller axle. I'm guessing this part works on umpteen different cars and the cost of a little ferrule in every box is cheaper than maintaining two different SKUs.
Reassembled and much cleaner

Re-assembled and the part was ready for re-installation.  Considering how easy this change was to do, I should have done it when replacing the belt the first time around. 

I'm happy that I took pictures as I went along, as I didn't know in which direction to install the new pulley -- but since I had a picture of the part right after removal, knowing what to do was easy.

Rattling Continued until it Stopped

Installed the belt, nothing notable there.  Fired-up the engine and it ran just fine.  But the A/C pulley was still rattling.  Figured this was OK, drove the car for about a week and the A/C pulley became louder, developing into a legitimate, full-blown racket.  The noise finally went away when the replacement belt broke, so I know what needs to be done to fix the root cause of the problem.  I've never done any work on an A/C system, so this should be a learning experience. 

Tuesday, August 30, 2016

A Funny Thing Happened on the Way to State Inspection

My Freestyle's due for PA inspection.  In my county, I'm required to get both a "safety" inspection and an emissions inspection.  The Freestyle was in need of new front tires due to very poor alignment and problems with the outer tie rods, so I had that done at the same time.  I take my cars to a local, trusted mechanic -- his guys do a great job when I need repairs when I don't have the time, tools or ability to get them done myself.

My car was finished -- but the dead battery resulted in the engine not being ready for emissions inspection.  Apparently, the way dead battery resulted in the emissions information being cleared from the computer and I hadn't driven it enough for the engine to accumulate enough data for the emissions testing equipment. This problem was easy to solve, I just needed to drive the car a bit.

That Burning Smell

And that's where my troubles began.  As I rolled up to a red light, I could smell something burning and that's when, in the still morning air, I could see the smoke pluming from the right side of my hood.  And the smell, it wasn't oil, it wasn't electrical components burning it was... I just didn't know. So I parked it and headed off to work.  That night, when I started it, the battery light was on and no power steering. A little more riding around and the smell and smoking returned.

Sniff again.  I've oft heard smell triggers memories better than any other sense.  Thanksgiving's
Not the problem
melody of sage, rosemary and pepper, the cheap perfume cacophony of your grandmother's friends at her funeral, the scent of your wife's hair on your wedding day: just one whiff transports you there, like it was yesterday, like it was the present.  The scent of a car's electrical system self-immolation puts be back in 1998 when, with a toddler and a two-week old, a flashing check-engine light and a small puff of smoke preceded the one-alarm destruction of our trusty Mazda Protege.  This smell was similar, but new, and not the odor of impending flames. Maybe.

Overflowing Power Steering

Leaking power steering
reservoir
Once in the garage, I popped the hood and noticed first, the power steering fluid was leaking from the cap.  Then a close look at the accessory belt made it clear the source of the problems: it was broken.  The belt drives the alternator (resulting in the battery light) and the power steering pump.
Without the power steering pump running, the fluid overflows the reservoir and leaks over the top of the engine (according to the experts at myfordfreestyle), producing the burning smell and smoke.

Broken Belt
Removing the belt was easy enough, just grab it and pull.  But... before doing that, I made a diagram of the belt's route around the various pulleys. Since the belt was broken, I needed to guess a little, but with most of the belt in the right position, not much was left to the imagination.

The access to the front of the engine would be excellent if it not for an air conditioning line running over the top of the engine, so I don't think I could install the new belt from the top, I would need access from the bottom of the engine.  The next best way to get enough access to the pulleys would be through the wheel well on the passenger's side.  So up went the car and off came the tire.

Easy as 1,2,3!

Plastic Rivets: Defeated!

To get reasonable access to the pulleys, I would need to remove the inner fender, affixed to the car with my nemesis fastener. This time, I would not succumb to frustration and decapitate them, but I would figure out how to remove them -- there must be a way.

After a little futzing, I had an answer: slowly back out the screw, pry under the screw head to pull it away from the fastener base, then pull the fastener out by the base.  Some of the road grime made this a little difficult, but I managed to remove them all in this manner, saving me a few bucks at the auto store for a new set of fasteners.  Not sure if this is the "official" method of removal, but it worked.

As the Pulley Turns

Inner fender removed
Inner fender out and with access to all of the pulleys, I tested each to see if they spun freely, with the exception of the crankshaft pulley.  Alternator was OK as well as the power steering pump.  The AC however didn't want to budge and this was cause for concern.  If the AC unit's pulley froze, that would have broken the belt.  Depending on the AC unit, even if the compressor clutch is disengaged, the pulley takes more force to turn than expected.  I just hoped this wasn't the problem and went ahead with the belt installation, which lead to the next problem.

Belt diagram I made earlier
To install the belt, it looked like the plastic guard over the AC pulley needed to be removed. The bolts wore 8mm heads, easily reachable with an extension. Started turning, and turning when it became clear the bolts were stripped.  The bolts ran through plastic and the prior mechanic just kept tightening until the threads disappeared.  That means, I should have been able to apply some pressure to the back of the bolt and it would slip out, but for me, no luck. Strange. I tried wedging a screwdriver between the two plastic pieces secured by the bolt, no luck there either, this was sort of weird, I wonder what's holding that bolt in place?  When I reached for a cutting tool I knew it was time for a break. So I went biking with my kid on the Butler-Freeport Trail.  Did all 42 miles! 

Belt Installation, No Cutting Required

Looking at the problem with fresh eyes, I saw enough room to push the belt between the pulley and cover, using a prying tool to do the job. Then it was on to the rest working counter-clockwise: power steering, alternator, crankshaft and then a slack loop held by the tensioner. 

Getting the belt around the the camshaft and tensioner proved to be somewhat difficult.  The tensioner is a pulley on a spring, that applies force to keep the serpentine belt taut.  When changing belts, you need to push against the tensioner's spring that effectively reducing the length the belt needs to travel, giving slack for installation or removal. I have a tool designed for this purpose, a 1/4in square drive end on a thin piece of metal.  I drafted my youngest kid to apply force so I could loop the belt over the tensioner and camshaft, but the new belt was tight enough that I needed to use the back my pry bar to slip the belt over the crankshaft pulley. Done!

Mark on AC pulley
Fired-up the car, and listened for the squeal of a stuck belt.  Turned-on the AC, heard the clutch engage and the extra load on the engine, no tell-tale stuck-belt squealing.  Just to make sure, I stopped the engine and put a little whiteout mark on the AC pulley so I could see if it turned.  Engine running again and white dot gone, I convinced myself the old belt just wore-out at an opportune time.

Put the inner fender back into place, with some satisfaction that I was able to re-use the fasteners and back on with the tire.  Took the car out for a few rides, let's hope it has enough miles for the emissions test to be run.

Tuesday, July 19, 2016

Outer Tie Rod Ends (penultimate task before PA inspection)

Worn tire
On the way home with the Freestyle, we noticed an imprecise feeling when we were steering and some tire squealing when we were headed around corners (my second oldest son was piloting).  The tire wear indicated poor alignment and when I lifted the car to check the brakes, I found that the front wheel had about 2mm of play, all of which pointed to some worn tie rod ends, and that, in fact, was the problem.

Indifference Curve
Indifference curves
Thanks wikipedia!

Shopping about for this part was interesting, there's all sorts of questions. How do you really know what's a quality part?  Is the brand name really an indicator of quality?  What about the reviews or what others have purchased?  Does a higher price translate into higher quality?  Will one site stock a collection of better parts and another sell lower quality parts, even if the lower quality parts cost more?

Economists attempt to model this behavior with the "indifference curve" mapping out where, given the blue budget line, the trade-off between good X and Y that would leave the consumer "indifferent" between the choices. The problem is, my basket of goods is just one thing and I don't have a clear idea of the price trade-offs. Adding to the problem, I'm not spending enough money to research the decision adequately, so the decision making will be far from a well-researched consumer activity.

Shopping About

For a part like this, controlling the steering, integral to the safety of the car, I purchased the cheapest option -- I'll get to why in a bit.  Here's what I found while shopping (data collected 9-Jul-2016, prices/url might have changed since then):
Replacement tie rod end
I found CarParts.com by searching (I use Bing more than Google, still waiting for the return of AltaVista and/or Lycos) for the part number found at JC Whitney.  The part was the same and about 2/3 the price, which brings us to the real problem: at which point would I be indifferent making a trade-off between these different choices? An economist would say consumers behave rationally, using all available information to arrive at a purchasing decision.  That's bunk for the following reasons:
  1. People approximate rational
    Some more than others, emotion plays a big part in how we act, I would posit a bigger part for people to assert otherwise.  Plus, we're so bombarded with marketing/ads I doubt we could make an unclouded decision.
  2. Information itself is imperfect
    Information tends to be an incomplete mess requiring some amount of assessment on the part of the person.  People will perform this assessment imperfectly, and according to #1, not in a rational way.
  3. "All available" information eludes market participants
    Consumers supposedly use "all available" information to make buying choices.  Here's the rub: most of the time we have a sub-set of data to interpret because we get board and give-up during the information collection process.
  4. Agency issues on behalf of information suppliers
    Getting information about your parts from a parts vendor?  Guess what outcome they'd like?  The information available has likely been skewed by the information provider who has ulterior motives. 
Those who schlepped through Econ 101, instead of taking some other course, frequently mis-apply efficient market theory to consumer purchasing decisions, while those who mistakenly signed-up for Econ 201 would use behavioral theory to explain consumer actions.  Actual economists readily admit, for most purchases, consumer preference comes from marketing and advertising.

Then, it dawned on me: there's no quality licensing process for car parts, not even a Underwriters Laboratory that does independent testing to certify parts meet some minimum quality level.  A quality constraint placed by a rating agency would put a floor on the price, because, in theory, a vendor could sell a paper mache part for $1.

Cheapest?  Why?

At a decade and 300K miles, let's be honest, I think the tie rod ends will outlive the car, even if they're not the highest quality. There's something else at play: does a high-priced part imply a better part?  As a consumer, I lack the information to determine what part is "better" independent of the price.  In the case of the same part being roughly half price at a different vendor, there's not a strict linkage between price and quality.

Let's get on with it: Removal of the old Part

Loosened the wheel lug nuts, lifted and secured the car with jackstands, removed the tire and got to work.

Size of bolt
First step: Loosen (just a little) the retaining bolt on the inner tie rod.  I didn't have a wrench the correct size, so I used an adjustable wrench to hold the tie rod.
Next: Detach the outer tie rod from the steering knuckle.  For this one needs both a deep 21mm socket, a 21mm box-end wrench and a 10mm socket.

This is where I found that I didn't have a 21mm deep socket or wrench, so I needed to get those before I made any additional progress.  Returned from the store with  both tools for under $20.  Seems like the $20 bill is the new $5 bill and the $100 bill is the new $20 bill in terms of purchasing power.  Times have changed.  Anyway...

Driver's Side: No Problem


The driver's side presented no problems.

First job, loosen the locking nut on the tie rod, move it back about 1/4 or even less of a turn.  Do this first, because when the tie rod is attached to the steering knuckle it's much easier to apply the necessary force to break the tension on this bolt, as the bolt will be held in place by some rust and road grime as well as torque.

Next, I broke the tension on the tie rod nut with my newly purchased deep 21mm socket and a breaker bar, this required about the same amount of force as a tight lug nut.  Once the tension was broke, the nut and bolt rotated freely, as the opposite end is a ball joint in the tie rod end, so I needed to apply force to both the nut and bolt to complete the removal.  With a 21mm wrench holding the nut, a 10mm did the job of twisting the bolt, which turned freely due to the ball-joint construction of the tie-rod end.  Note:  the nut needed to be turned clock-wise to loosen when holding the bolt and rotating the nut.

With the driver's side completed in less than 10 minutes, even taking pictures, this job looks to be quicker than an oil change.

Passenger's Side: Six points too many

Not the best idea, this didn't work all that well
The passenger's side was a little more of a challenge.  The breaker bar did the hard work but then the 12 point 10mm socket that worked fine on the driver's side stripped while removing the bolt. At this point, I should have noticed that these parts were different (obviously cheaper), but it didn't register yet. Doused the nut in PB Blaster and waited.  Used vise grips to get a better hold, but they were slipping as well.  Seeing that I had a bit more of the bolt not stripped, a deep socket 6 point 10mm socket worked and I was able to wind back the bolt.  The part where the 10mm top of the nut failed looked to be a replacement part versus the driver's side which appeared to be original.
Starting to like the color sockets

The passenger's side tie rod was in much worse shape than the drivers. This is when I noticed that this was also a different part as well.  Tie rod ends should be replaced in pairs.  If one has worn to need a replacement, part on the other side is probably ready replacement as well.  The other aspect is the performance of the car itself, a nicely working tie rod on one side and a dodgey one on the other will result in odd handling.

Looking the parts, it appears like the driver's side is OEM and the passenger's side a replacement part.  The picture shows how the part has a torn boot, what you can't see is that the bolt in the tie rod just flops about with no stability.  This would make the car's handling wayward and a correct alignment would be impossible because the tire wouldn't stay in a predictable position.
This might be a problem

One thing you can't see in the picture is the complete lack of resistance offered by the nut protruding from part, it just flopped about with little resistance.  When in the car, this fault would result in wobbly handling and vague steering -- although I can't say I noticed much during my pre-purchase test drive; however, the issues were readily noted on the way home.

Six vs Twelve points: Less is more?

OK, I shouldn't have been using the 12 point socket, because these generally result in more frequent stripping of the fastener, as what happened in this case.  I've found that it's easier to strip a fastener with a 12 point socket, but finding a good reason as to why that's so is easier said than done -- it's almost a vi versus emacs level "debate".  Common sense says the 12 point sockets apply force to a smaller area of the bolt, but that's not settled science at this point.

Installing Parts

Since I just moved the locking bolt back a little (less than 1/8 turn), I used that as a guide for the new part, as not to mis-align the vehicle too much.  Given the state of the alignment, I'm going to have this re-done anyway with the new front tires.  Side by side, the parts were the same length, so the position of the bolt would imply the position of the new tie-rod close enough.

I put a little anti-seize on the outer tie rod end so alignment would be easier, the tension from the locking bolt will keep this part from moving. The ends then need to be filled with some grease and I have a "small" grease gun that attaches to the grease fittings to do the job.  I put about 5 or 6 pumps of grease, this resulted in the excess grease leaking out, so I knew the fitting was filled.  This is where I encountered my first non-metric bolt, the grease fitting needed a 5/16th socket to wind into place.

Done, note the grease dripping from the 
Used a breaker bar to tighten the bolt, tire back on and all done!   The spec calls for 85 ft/lbs of torque on this part, I think I'm close enough if not over.  This was a quick job, no more than 30 minutes a side, even with the problems removing passenger's side part, taking my time to make sure I did it correctly and taking some pictures.

Parts Comparison

I've included a picture of the three tie rod ends in this job, the closest being the tie rod I removed from the passenger's side with the torn boot, the farthest being the newly purchased replacement part and middle being what looks like the original.  I think with some grease, the original part would still be serviceable.  A little measuring revealed the dimensions of the OEM part were about the same as the replacements, with one key difference: the diameter of the end where the ball join sits is about 2mm bigger on the original part.  The failed replacement also didn't have a grease fitting, so one assumes it was (or maybe wasn't) lubed at the factory and the absence of a grease fitting and no hole for the fitting were "design for cost" feature deletions. 

I'm not of the quality of the part I purchased, but I would be very surprised if it outlasted the vehicle. Maybe I'll be surprised.

Alignment

As can be seen by the tire wear, an alignment is necessary as well as two front tires.  For this, I'll visit my local tire shop. A quick survey of local-area shop shows the alignment will cost about $75 and I'm trying to economize on the tires as well.


Wednesday, July 13, 2016

Cleaning Throttle Body

While taking things apart to fix that torque bushing, I removed the throttle body,
Close-up of dirty throttle body
held on by four 9mm bolts to get access to the bolts holding the torque arm in place.  It looked dirty. In the extreme close-up, notice the tar deposits on the top and bottom of the flap. Figuring things work better when clean, although I really don't have proof of such a hypothesis, I decided to remove the gunk before re-installation.  Cleaner specifically for this task exists, so that's what I used.

The Cleaning Job

Throttle body cleander
Clean!
Completely removing the throttle body from the car made cleaning both sides a snap.  I'm not sure what comprises throttle body cleaner, but it melted away the plaque deposits on contact and probably reduced my lifespan by three to six weeks.  Wiped the run-off away and that was it.

If the part wasn't off the car, cleaning would have been much more difficult, as I would have needed to hold the spring-loaded flap open during the process so I could clean both sides.  The part went back on the car when reassembling the rest of the air intake system.  The four bolts were tightened to "hand tight".

2006 ford freestyle throttle body
Clean too!

Can't really be sure if this made or will make a difference in performance or fuel economy. Maybe the throttle will turn a little easier as I've removed some of the gummy material from the pivot points, so that actuator won't have to work too hard to reposition the throttle.  Since a spring pushes the throttle closed, that won't have to work as hard when closing the throttle.

2006 freestyle intake manifold dirty
Rest of intake dirty...
What was still very dirty was the intake itself.  I tried to clean this a little with just a rag, but I think, like the throttle body itself, removal first would yield the best results. Just inside the intake was a sensor, I didn't want to contaminate that with cleaner that could cause damage.


 Two observations worthy of note

  1. This is a "throttle by wire" car
    A set of electrical wires controls the throttle, there's a servo in the throttle housing to create the force to overcome the spring and open the flap to increase air flow. No mechanical connection between the driver and the device feeding air to the engine. I would bet the engine management software decides how much to open the throttle, the position of the accelerator pedal being just one of the factors in the decision-making algorithm.
  2. The spring-action of the throttle will result in closure by default
    This is design for graceful failure, I would guess.  The mechanical spring will force the throttle closed by default, so if the actuator in the throttle fails, the lack of air will result in the engine stalling, which seems to be the safest of alternatives.  A neat, fail-safe, design.
I'm not sure how to assess a cost, as I already had the cleaning chemicals on hand and I'm not sure how to account for few paper towels.  For tracking purposes, let's say the cost approximated zero.  RepairPal says this would cost about $200, labor being the biggest factor in the price. This was an easy job, something to consider tackling on your own and saving those two Benjamins for something else.

Tuesday, June 7, 2016

Thermostat, completing the water pump job

Getting to the water pump meant removing a cooling manifold containing the thermostat.  There's two things going on here:
  • Thermostat
    This component works by blocking the flow of coolant out of the engine until the fluid reaches a certain temperature, making it easier for the engine to run when just started.  Even in a "hot" climate, the engine will start "cold", relative to its operating temperature.  Check out this article for an excellent, in-depth explanation.
  • Manifold
    This distributes the coolant to different parts of the engine.  There's seven (count 'em) different places coolant flows from this manifold, with the water pump providing the necessary pressure to push the fluid where it needs to go.

Doing the Replacement

Manifold just removed
Replacing the thermostat was imperative because when this component fails, the failure causes the liquid flow being blocked independent of the temperature, resulting in in the engine overheating, leading to all kinds of problems, the most common of which is an engine block that forms cracks because of the combination of heat and pressure. Since this part is sub $10 and it's being removed anyway, changing it is the right thing to head-off any (expensive) failures down the road.

Using an 8mm socket, I removed the three bolts around the housing and extracted
Can't re-assemble incorrectly!
the old thermostat and O-ring with my fingers.  In went the new O-ring ($0.39, so I splurged!) and thermostat and back together went the manifold.  This is where I noticed a very neat design element: the manifold halves are polarized so they can't be assembled incorrectly.  I can't imagine this costing any more to manufacture and the design costs would be virtually nil, even if saves just .05% of the parts from mis-assembly, FordMoCo is ahead of the game. Clever!

The $0.39 seal; a nail maybe?
The picture of the new and old thermostats wasn't very good (camera problems!!) so I've included a picture from the top where the deposits from years of use can be seen. Otherwise, there wasn't much visual difference between the two.  The old part looked a bit worse for wear, but it spent the last 10 years submerged in a chemical bath, alternating from sub-zero to scalding, so that's to be expected.

Left old, right new and shiny
As mentioned, replacing this part isn't 100% necessary, as the existing part was working correctly.  For the low cost and since the system was already drained of fluid, and I had to remove the manifold anyway, it just seemed like the right thing to do, considering the cost caused by failure.  Failure of this cheap, easily accessible part can bring down the entire engine -- the classic "for want of a nail, the kingdom was lost" effect.  You see it so often, in others as well as ourselves, wondering how such a common, well known human failing continuing, seemingly, unabated.  How many times have we cast aside something small, ignoring the beckoning in the back of our minds, yet still be surprised at the final outcome?

Yet letting go of the little things is paramount to living a sane life -- concentrate on all of them and madness will ensue.  One can never know the loss of which nails result in the loss of the kingdom and one can never keep track of them all, or even figure out the relative importance so to fix the kingdom-dissolving nails.  Keeping a kingdom seems to be a combination of vigilance, hoping to fend-off enough small problems before they become large (or combine to be large), and sheer luck.  For now, we'll do our best by our Freestyle and hope for luck.

New seal installed


There's one more seal on the manifold, where it attaches to the water pump.  I replaced this as well, at the cost of a little over $4. Why so much, did I get an artisan, free-range seal? Hopefully these components will last the life of the car.  I didn't put anything on the seal in terms of lubricant, I don't usually unless I get specific instructions otherwise, as this film could interfere with the mating surfaces.

Once the manifold was back in place, all seven of the hoses were re-attached.  The hoses appeared to all be in good condition, no need to replace them now.

Re-filling the System

This was the last part of the water leak issue.  The car now needs to be filled with coolant, which was drained at the start of the process. The best advice is to use an air lift tool to remove the air from the system and then use the vacuum it creates to pull in the new coolant. Being without a air lift, my approach will be to fill the system from the overflow tank, run the engine and keep an eye on the fluid level, since air rises above water, the system will slowly purge itself of air.  Not being sure of how much water remains in the system, I'm going to fill with straight coolant first and then remainder with water and guess it will be approximately the correct proportion (should be 50/50 water/coolant).

This worked well enough.  I let the engine run until it was at operating
Coolant overflow tank.  Use a funnel!
temperature, when the thermostat opened,  it sucked most of the fluid out of the overflow tank and I saw some bubbles burp forth and then another draw on the reservoir of water in the tank.  A few more burp/draw/fill cycles and the fluid level reached steady state.  I added about 2/3 a gallon of water, so I should be at approximately a 50/50 mix given the coolant system wasn't completely empty when refilling started.

Ford uses "standard" ethyl glycol for it's coolant/antifreeze.  The compounds in the coolant have less heat capacity than water.  Since coolant is sold in a concentrated form, using 100% coolant in a system would result in the engine running hotter, because the coolant can't absorb as much heat as water.  Not enough coolant will not lower the freezing point of the water enough, so in cold areas, the liquid in the block could freeze, blocking coolant and since water expands when frozen, potentially cracking some of the engine components.

And not just any water.  Peel out the sub-$1 per gallon for distilled water.  The water delivered to your tap, if supplied by a municipal system, contains a mix of chemicals to keep your teeth from rotting, make the water palatable and prevent beasties from inhabiting the water lines, none of which an engine requires.  Water drawn from a well contains an even larger set of minerals and chemicals.  Using distilled water is one of those "nails" that's easily accommodated.

 All Done with Water Pump 

This was the last chore for water pump replacement, the most pressing problem
Installed pump, no leaks
in the engine bay and I think the cause for the car's sale.  I've included a picture if the shiny new water pump installed with the cooling manifold back in its rightful place with all of the hoses reattached.  The car's been running for a week with no oil stains, so if the seal is leaking, it's not in enough volume to drip down the engine bay... yet.  As for the water pump itself, no leaking either.

Disposal, not just for oil

Don't just pour whatever came out of the engine down the drain or on the ground!  This thinking goes for coolant too; treat this waste like used oil and dispose of it properly.  Most auto parts stores won't take used coolant, so this will require a little more effort on your part, but we all live here, so do the right thing.  Used oil reclamation generates a small profit, since coolant would only cost money for disposal, there's no "free" recycling offered at most parts stores.  If you don't have curb-side pick-up for hazardous materials, take it to the nearest collection center (search for "hazardous household waste collection near me") and fork over the few bucks for proper handling.  

I poured out the remaining distilled water (this is 100% clean, I would drink it but pure water tastes not so good) and used the jug and the container from the new coolant to transport my used coolant to the disposal center, so these can be recycled as well.