Showing posts with label unexpected. Show all posts

Sunday, February 4, 2018

Battery of problems

As noted, several times, my battery has died after letting the car sit unstarted, for shorter and shorter intervals.  Usually, after a jump and a nice drive later, all of the electrons were back in their proper place.  This time, I wasn't so lucky, and after a few 30-minute drives home, the battery didn't hold a charge overnight.  Something was wrong.

Did I have a parasitic drain on an otherwise good battery due to dodgy wiring in my Ford?  Or, did my battery have one terminal in the grave?  I found out, somewhat inclusively, but not before disabling my wipers.

Tuesday, March 14, 2017

P0171 and P0174, solved!

The CEL started to glow and the resulting error codes were P0171 and P0174 both mean that the engine is running lean, which means too much air and not enough gas.

Not being sure what the problem was, and starting with the "not enough gas" theory because, well, that just seemed a good place to start.  Up went the hood and the problem became a bit more obvious
The line from the brake booster, which is powered by the suction of the engine as it's taking in air (an engine behaves as an air pump) became disconnected and that resulted in more air making it past the throttle than the engine management system expected. 

Here's what things look like after proper assembly
Eighteen seconds later and my repair was finished.  Not having my phone handy, I used my old-timey OBD scanner tool to read the codes and then clear them from the system
The codes didn't return after 100 or so miles, so this was definitely the problem.  In anticipation of the problem being the fuel filter, I have a new one of those on hand, I'll post when I get to replacing the existing filter which appears to be old and in need of swapping with a new one.

Sunday, February 26, 2017

P0171 and P0174

After a few weeks of smooth running, I see the check engine light, I thought it was the fuel cap not tightened.  Fired-up Torque and the codes P0171 and P0174 came forth from the engine management system.

P0171/P0174 means the fuel/air mixture is too lean.  That means a) too much air b) not enough fuel c) some combination of a and b or d) a defective sensor.

Air?

In the case of d, we'd be looking at the mass air sensor, but let's assume our sensor's telling us the truth and we're not getting enough gas or too much air.  Let's start with the air: I checked under the hood and the path from the filter to the throttle looked OK.  That leaves the intake manifold seals.  Not sure how old those are, could be the culprit.  Alldatadiy recommends that I also check the EGR system as well, that seemed to be OK.

Gas?

Next the gas: No leaks.  The filter (sorry, no picture!) appears to be old -- could even be original.  The fuel pump might not be moving the fuel to the I'd start with replacing the fuel filter and see if that helps.  But first, I'll clear the code.  If the code appears again, I'll know it's not just a ghost in the machine.

Environment? 

It must might be the unseasonable temps and the huge dip in temperature the last few days.  Here's last week weather thanks to timeandate


Maybe there was some condensation where there shouldn't have been with the quick dip in temps.  Or couplings cooled at different rates, allowing for some leakage. If the code doesn't come back, I'd attribute it to the sudden shift in weather; but, I think that's wishful thinking and something will need to be fixed in the near future.


Tuesday, January 24, 2017

Limp Home U0101 et al...

Just doing my errands, heading home from the grocery store and what do I see but the return of the wrench and engine lights along with the RPMs leaping as the engine decides that limping home is the best way home. Fortunately, we were just a few miles from casa del 500 dinero coche, on roads where the top practical speed stays below 35MPH, so no biggie.  Can't say my passengers were all that happy, even though the car performs well most of the time, they expect to be stranded for every outing.

I was able to get the codes from the car using the Android “FordSys” program (more on that later), here’s what I have:

Code
Meaning
U0101
Lost communication with TCM (transmission control module)
P0641
Sensor reference voltage ‘A’ circuit open
U0415
Invalid data received from ABS (anti-lock braking system) module
U1900
No description
B1318
Battery voltage low
B1342
Electronic control unit is faulted

After letting things rest (and the super-cap drain so things reset), the engine started no problem, no wrench light and the check engine light turned off after the second engine running cycle, just like the last time this problem occurred.

Sometime a few months ago, I broke down and laid-out the $29, or something like that, for an AllData DIY subscription for the Freestyle. For the error codes in question, there’s a bunch of “pin point” tests to check for continuity and wiggle checks for the connectors.  What All Data doesn't provide the full schematics for the car, as I'd like to see where +5v circuit A goes, as I have an intermittent issue with some segment of that wiring it seems.

Looking at the codes above, I’m guessing a short or disconnect (somewhere?) resulted in a few components going into reset due to a voltage drop or the networking between the components failed due to signal integrity. Before replacing parts, I need to make sure the communication between said parts works properly, or I won't be fixing the problem by swapping what's at either end of a bad connection.  I’m presently replacing the brake lines on my kid’s Grand Am, so the actual checking will need to wait for a bit.

FordSys

All of the diagnostic information comes to me complements a program on my Android phone called FordSys. A regular code-checking program returns no problem codes, because what’s reported above aren’t in the standard inventory of codes for engine trouble a generic code reader reads. I very much like FordSys, I’m not so crazy about the intrusiveness of the ads.What was small ads on the bottom of the screen has morphed into full screen overlay ads. I’d much rather pay the developer, who deserves the money for his hard work, and not be bothered with ads at all.

Saturday, December 24, 2016

Christmas tree and a trip to the mall

We went to our local tree farm (being out in the country, there are several tree farms to pick from) to slay our Christmas tree.  The "product" of a fresh-cut tree involves climbing on a tractor, being abandoned in a field with a saw and hauling the tree home atop one's car after the tree has been baled. Wondering around in the field looking for a tree means that quite quickly, nearly all trees begin to look the same.  Only once it's home does one notice the bald spots and general crookedness of a tree that looked just fine in the field.  Buying a used car is pretty much the same experience, what looks to be great in the lot with its companions seems to loose its luster once you've gotten it home. Buyer's remorse?  Maybe it's just too difficult to process so much information at one go, so our brain fills in the details, dents and scrapes.  When we're looking at one car, we can the concentrate on the finer details.


Probably won't fall off, maybe?
 We didn't always go Christmas tree hunting, in our family, BC (Before Children, or, BCE, Before Children Existed for the folks with a knot in their kickers and variously colored hair.), we celebrated Christmas sans a tree. Having a $500 dollar car means not having to worry about dents/scratches incidental to getting the tree home, all one needs to do is heave the tree on the roof and secure it with some twine.  No padding or a tarp, just get close and lob.  It wasn't always like this, when we drove an overpriced Honda SUV or pricey minivan, we cared about the roof.  Dents?  Scratches?  Sap? Mud? All of that used to matter when our car monthly payment approximated the purchase price of the Freestyle.

One feature of the Freestule that I just love is the raised roof rack.  This made securing the tree much easier, as I had an easy place on which to loop the twine and make knots.   In the process poorly securing the tree to the car, I looked down and what did I see by an expended hypodermic needle.  It's probably flotsam from a friendly neighborhood injectable drug user, either getting their tree or working in the fields.  Maybe a diabetic?  Most diabetics fanatically keep their sharps safe, so maybe, but unlikely.

A trip to the mall, some more Christmas lights

Limp home mode
The next day, we got the first snow of the year: better than a light dusting, maybe one or two inches. On my way to the mall, after dropping my kid off at work who didn't want to drive in the snow I felt the AWD system kick-in and then my troubles started.  The car went into "limp-home mode".  An Eat 'n Park was close by, so we stopped there for brunch and after eating we'd see if the problem went away, as stopping for a quick road-side reboot of the engine didn't help.  I didn't have my code reader handy, I'm not sure what problem occurred, but we got the combination wrench and check engine lights, as the picture shows.  This can mean either transmission, transfer case or throttle problems.

Former furniture store
Post breakfast, the engine started without an issue.  We needed to head to the mall for some shopping, which was close. If the car became cranky again, the plan was  to have the better half shop while I called for a tow.  I'd have a nice place to wait at the mall for a tow truck and would return to the mall with a working car.
My last visit to the mall was... I can't even recall when I was last at the mall, but over the years, there's been a shift from retail to personal services.  Now, however, the transition now seems to be from personal services to just empty spaces, not unlike the transition many small town's main streets in the area endured in the 1970's as retail fled main street for the mall, store fronts turned into exercise and tattoo parlors before the front windows served to hold news paper concealing the empty insides.

Earlier this year, before the retail season, Sears closed at the mall.  When the Beaver Valley Mall opened in 1970, Sears was an anchor tenant (along with Gimbels and Horne's), maintaining the same location for 40+ years: a dependable source of tools, lawnmowers,
As always, an empty lot around Sears
boots, Levi's and something polyester your grandmother would wear to a cousin's wedding.  The next biggest tenant, Macy's, doesn't look to be sticking around, as the upper floor has been closed and the range of merchandise greatly decreased.  Meanwhile, across the street, Wal-Mart's lot brimmed with shoppers.

Sunday, December 4, 2016

Water Pump, Encore!

When your correspondent last wrote, my Freestyle stranded me on the way home from the Pittsburgh
Frownie
airport.  Something in the cooling system failed (I was guessing the thermostat, which turned out to be half true!) and when I tried to slowly return home, stopping to let the engine cool, my wife guilted me in calling a tow truck and having her meet me for breakfast.  I came to a stop at King's, a chain started by Hartley King, an offshoot of his fuel distribution business.  Kings always played second-fiddle to Pittsburgh's dominant family chain "Eat 'n Park", despite having both better breakfast and desert menus.  For years, as a counter to Eat 'n Park's "Smiley" cookie, King's had the Frownie -- a stroke of marketing brilliance to counter the Smiley -- a brownie with a no-so-menacing frown.  But it went deeper than the frown: the earth-tone brownie matched the Kings décor to the tee, the fudgy bites were more substantial than the nearly flavorless Smiley cookies, like the food at Kings versus E'n'P.   Kings has since been purchased by some outfit on the west coast and is losing it's quirkiness, the menu isn't on the placemat anymore, the Frownie retired to mascot Florida and decidedly 70's faux wood Formica décor replaced by cleaner and brighter tiles and paint.

I didn't have the chance to look into the problem that day and some home things kept me from tearing into the engine for about a week.  When I did get to seeing what was happening, I had the following suspects, in my order of probability:
  1. Blockage in radiator
    This would keep the coolant from flowing, since I was not getting heat in the cabin, this would sort of make sense, but I would have expected some coolant flow from the engine to provide some heat.
  2. Thermostat valve failure
    I replaced this already, but it could have been the problem, maybe a discount part failed?
  3. Water pump
    Least likely, since it was just replaced.
I'm thinking #1 as the problem, since I replaced the thermostat and water pump.  But, the nature of the symptoms (over heating engine, no output from heater) lent itself to being a failed water pump, despite it being replaced just a few months back.  I started by removing the various pipes from the cooling manifold (using a basin to catch the fluid) and to my surprise, saw some fresh oil dripping on the starter, along with a whiff of the "oil and coolant" smell.  Something interesting is afoot, just not sure what.


Note oil drip on starter...
  Off came the water pump.  Flipping it over, I see oil leaking from the weep hole of the pump.


This was odd, because water pumps shouldn't contain any oil.  Then, on close inspection of the part, the nature of the problem became more obvious, looking closely where the pump interfaced with the cam shaft:


Then, it can back to me...  When I was pulling out of the airport, I heard a squeaking/grinding noise, I that was this part of the pump breaking and being reduced back to the metal powder from which it was formed, in the process tearing the seal around the camshaft, permitting the oil into the pump shaft.  Here's what the seal looks like in the engine:


At this point, I needed to replace the water pump and seal.  But the thermostat was OK, right?  No it wasn't, so that will need to be replaced as well.  What makes this more frustrating is my smugness over having the luxury of time to do the research and wait for delivery.  At least I have practice!

Monday, November 7, 2016

Overheating and stranded

I was out of town for most of last week, at a company site in CA.  When I travel to our offices in California, I usually take the early AM flight Monday from PIT to SFO and drive to San Jose.  This flight is usually at 100% capacity.  However, this week, I departed on a Tuesday and found myself in a row with an unoccupied middle seat, and on the way back on the red-eye Friday, same seating arrangement!  Unusual. What was also unusual was the pair of basset hound "emotional support" animals waiting to board the plane I just departed (was too tired to get a picture, sorry!) on Saturday morning.  We have a basset hound, they're great dogs, but they smell, shed and drool more than the average traveler.  While the bassets display excellent temperament, they tend do want to do their own thing and will put their weight into getting their way, so I can't imagine one being on a lap and compliant for even a short flight.

Overheating


When I returned to airport lot, I jumped into the car and made it about 5 miles down the highway to discover the engine heat climbing.  I also heard a bit of a weird noise coming from the engine, a high pitched whine.  I stopped on the highway's shoulder, let things cool-off then got off the highway and stopped again at a gas station, then at a McDonalds, Rite-Aid, Golf course -- each time the temperature made it too close to the red-line for me to be comfortable.  After 2 hours, traveling about 18 miles, I stopped at the King's in Monaca called my wife to meet me for breakfast and then AAA for a tow home. 

I didn't want things to get too overheated, as that could cause the a head gasket to break or worse, the block to crack.  Since I hadn't called AAA in a while for a tow and I wasn't that far from home, this was covered under the cost of my membership.


By this time, I was tired and just a little more than frustrated.  This would be the first time the car left me stranded.  At least I was close to home and could easily get to help.  But still.

There's a few things this could be:
  1. Water pump
    The engine was overheating because coolant wasn't circulating through the system.
  2. Thermostat
    Coolant was being blocked from flowing through the system, resulting in poor cooling.  Maybe not the problem, in many cases the coolant will still circulate through the heater core before the thermostat opens... But I wasn't getting heat, so maybe not.
  3. Radiator
    A blocked Radiator can result in decreased cooling efficiency. 
  4. Coolant leak
    Could be a problem... But I found that the system contained lots of coolant and the cooling system was under pressure, so I think I can cross this one off the list.
Recall, that I replaced the water pump and thermostat already.  Could one of the new parts failed?  It would seem so, but that would be a real bummer.  There's some interesting things of note I'm mulling over:
  • Heater wasn't working.  This could mean a the pump was not circulating the coolant or the thermostat wasn't opening to let the water circulate through the heater core
  • A squeaking noise was heard as I was exiting the airport.  I thought it was the wheel, but maybe the water pump?
I have some yard work to do, so won't be able to tackle this problem in the next day or two. Considering these parts have been replaced once already, I'm not that happy about having to do the job again.

Despite the car problems when I got home, the trip was great.  One of the great things about the San Jose area: all of the great food around the area! The people at the office might think the various Korean hot pot and Pho places are pedestrian, but it's a delightful culinary break for me.  One of the new things I tried was persimmon, a crisp fruit with what I can describe as a sweet, crunchy pumpkin taste.  There's a much musher variety of persimmon as well, but the firm variety makes for the best out of hand snacking.  Can't find any in these parts, so I'll have to bring more back from my next trip.

Thursday, October 27, 2016

Red Bentley

On my way over to Wal-Mart to get some provisions, and what did I see, but a Continental GT parked off by itself, so I decided to give it a little company whist shopping. 


While pulling into the spot, I realized that I didn't have the best idea of where the hood ended on my car.  I made sure I kept my distance between our bumpers and got this picture before heading into the store.

BTW: the AC is mostly replaced, we're in good enough shape to be on the road, lots of notes and pictures I'm organzing into a few upcomming articles -- learned more than I expected about AC systems.

Tuesday, October 4, 2016

Aww, Snap!

So, my accessory belt broke again.  The first time the belt broke, I wrote the problem off to possibly the age of the belt.  It didn't seem unreasonable that the belt was not replaced recently considering the overall poor maintenance of the Freestyle.  When I replaced the belt, I didn't determine the root cause of the failure, I fixed the symptom, or second-order problem.

Belts fail due to the following reasons, and primarily the first two
  1. Age
    They're rubber + nylon, so after a while, the rubber and/or reinforcing material breaks down, causing the belt to come apart.  Belts in this state can be described as "crispy" as the rubber looses pliability.
  2. Pulley Problems
    The belt rides over a number of pulleys to transmit the force of the crankshaft to other components.  Problems such as poor alignment, wiggling (float), or a stuck (frozen) pulley will break a belt.
  3. Obstruction
    Stick + belt = broken. This is unlikely, but so is winning the lottery, and there's probably hundreds of lottery winners every day.

Proper Diagnosis

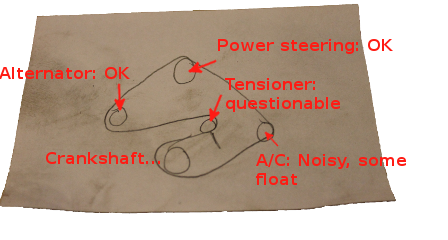
In my case, since the belt was new, #1 was ruled out, but number 2, well that's probably the problem.  I checked the pulleys before replacement, here's my findings:

Annotated Belt Diagram
The tensioner pulley was as stiffer than an old man's back and the AC pulley was noisy and presented some float.  Float, in this sense, is when a pulley moves perpendicular with respect to its axle.  I decided to take a chance a replace the tensioner: firstly, it was cheap (sub $10) and considering it looked the age of the car, I wasn't surprised it wasn't rolling quietly and smoothly.  The next possible problem would be the A/C pulley, the float causing the belt to be incorrectly aligned and come-off the pulley, but that would be considerably more expensive, so lets start with the cheap fixes first. 

Replacing the Tensioner Pulley

Lots of room to remove part
I put the car up and removed the inner wheel lining to get easy access to the tensioner, held to the engine with one 13mm bolt.  I was expecting a struggle, with a very tight bolt, affixed with a double-dose of blue Lock-tite.  A good pull on the ratchet and that was it! I removed the rest of the bolt with my fingers -- almost too easy.  The part then just fell off into my waiting hands.
There's two other pegs (circled) on the tensioner to hold it in place, once mounted to the engine. This is neat design in that the tension cannot be incorrectly mounted and, at the same time, can be held in place with just one bolt, saving assembly time. 

As with the rest of the engine bay, the part was covered in oil.  I'm sure that I'm leaking from the valve covers, and/or the cover over the timing chain and/or the camshaft seals.  More leaks than an onion farm.  As long as I don't have a puddle in my driveway, that's a problem for a different day.


New (l) and Old (r)
Once off the car, I cleaned the existing part, removed the old pulley by removing the 8mm bolt and swapping parts.  My new part included a small adaptor for applications where the part rested on a smaller axle. I'm guessing this part works on umpteen different cars and the cost of a little ferrule in every box is cheaper than maintaining two different SKUs.
Reassembled and much cleaner

Re-assembled and the part was ready for re-installation.  Considering how easy this change was to do, I should have done it when replacing the belt the first time around. 

I'm happy that I took pictures as I went along, as I didn't know in which direction to install the new pulley -- but since I had a picture of the part right after removal, knowing what to do was easy.

Rattling Continued until it Stopped

Installed the belt, nothing notable there.  Fired-up the engine and it ran just fine.  But the A/C pulley was still rattling.  Figured this was OK, drove the car for about a week and the A/C pulley became louder, developing into a legitimate, full-blown racket.  The noise finally went away when the replacement belt broke, so I know what needs to be done to fix the root cause of the problem.  I've never done any work on an A/C system, so this should be a learning experience. 

Sunday, September 25, 2016

Disappering Coolant: Fixed!

My testing harness for dashboard warnings lights, which, incidentally can be used for transportation, presented me with a coolant low light.  And, in fact, the coolant was low, so the sensor was accurate.  (I've always been a little frustrated when the first response to an irregular reading from a sensor is to replace the sensor itself rather than the problems being reported by the sensor.) The next question was, where was it going?  A little investigation revealed it was leaking out of a pipe that ran along the bottom of the radiator, connecting the overflow tank to the radiator and pump.  This was less of a mechanical problem and more of a plumbing problem.

I was disappointed in myself because I saw this dodgy pipe while fixing the water pump and thought to myself: "If it's not broke, don't fix it" and just because it looked dodgy didn't mean it actually was dodgy.  I'm guessing that once the system was running at proper pressure, a weakness in the pipe developed into a leak.  Mechanical systems seem to wear as an entire system, so replacing a part exacerbates the wear in others.  After replacing this pipe, the next-weakest part of the pressurized cooling system are the hoses, then radiator and then the engine block itself.

Locating the part itself was a bit of a hassle.  It was only available directly from Ford -- but when you order from Ford you effectively get overnight delivery to a Ford dealer and it so happens there's one just on my way to work.

Out with the Old

Fixing things was straight forward.  I drove the car up onto ramps, no need to lift using a jack and place jack stands.  Drained the radiator into a bucket from the petcock and found my second Imperial fitting on the car a 1/2inch plastic nut serving as the valve for the petcock, gave it a turn and I didn't get that much coolant.  I could still feel the liquid in the other side of the tube so I'll be ready to catch the coolant when I remove the rubber hose. Curiously, I replaced my dishwasher the week before, all of the fittings, hoses, nuts, bolts were Imperial as well.  Maybe the Crown has a lock on plumbing fixtures as well as socket ends?

Francis X. Clampazzo
To do this job, I got a new toy^Wtool. It's a tool specifically designed to open the clamps on radiator hoses.  It was about $18 on Amazon and a bargain at twice the price.  I figured I would need to remove and replace at least six clamps, and some were not easily reachable.  Having the wired extension made removing the clamps easy in that it was able to open them enough to have the stop tab keep them open.  After opening the clamps, removing the hoses was remarkably hassle free. Without this tool, it would have been much more of a struggle.

With all of the clamps opened, I removed the lower hoses, careful to catch the coolant still retained in the system. About another gallon of coolant exited from the bottom of the radiator. Even with my fancy tool, I had trouble reaching the clamp on the lower hose, so I unhooked the oxygen sensor and pulled the pipe still attached to the coolant return hose upward, looking as though I disemboweled my Freestyle.  The last hose clip could now be reached with ease. 

Failed Clamp

Once out of the car, it was also clear that the section of the pipe closest to the water pump took the brunt rust damage.  When tried to remove the fitting around the hose with my tool, I noticed that is was nearly rusted in half and had adhered to to the rubber.  While I didn't
test, I would be surprised if this didn't hold the rubber to the pipe with enough pressure, resulting in yet another leak.  With very little effort I was able to pull the two parts of the clamp away. The nice straight seam in the metal was a bit odd in that I didn't see anything the fitting was resting upon to cause this indentation.

The pipe's integrity was greater than anticipated, as I expected the pipe to simply collapse into pieces, or fracture where they meet the rubber hoses.  Instead, I needed to scrape a little to find the problems: in two places the rust gave away to expose holes in the pipe.  For comparison, I've included a side-by-side picture of the old part and its replacement.

I'm going to guess enough metal remained to hold liquid at STP but not at running conditions.  With the system no longer leaking at the water pump, the system was under much more pressure than before, thus forcing the liquid out while the car was running. The leaking had also corroded one of the hose clamps, reducing it's ability to hold under pressure as well.

I got everything taken apart and the clock struck eleven bells.  Being a work night, I decided to clean-up and get ready for bed.  I was working in garage and it was a warm evening, so I decided to leave the door open and I pushed the bucket of coolant under the car so the cats wouldn't be tempted to imbibe and it would be out of reach of the kids (worried about them kicking it over), as coolant can be re-used.

In with the New

The next day, a little bit of dish soap on the ends and I "test fit" everything back together again, putting a little soap on the ends to make adjustments easier: 
Auto repair isn't my forte (if you've been reading the blog, that's painfully obvious) but plumbing...  I've done enough plumbing to not make the obvious mistakes.  The process of test fitting lets you understand how sets of fittings will work together before actually welding/sweating them into place, making it easy to fix problems.  In the illustration, I've circled the two fittings I needed to turn the other direction so I could reach the bolt head to tighten them.  Here's what it looked like once in the car and I realized I needed to flip things around:

The air filter housing blocked access to the hose going into the water pump, so I removed the 8mm bolt and pulled it from its rubber grommets.  With that out of the way, I reattached the water pump hose, radiator hose, and return hose -- the soap making it easy to position the rubber hoses.  Just like the dishwasher I installed earlier, I "test fit" all of the connections before clamping them into place.  This works so much better than tightening fittings "as you go" because mistakes can be fixed easily.  In my test fitting, I found that I put the bolt heads on the new clamps facing the wrong direction and I needed to twist the hose heading to the water pump about 90 degrees.  Once lined-up I tightened the various clamps (using an 8mm socket) to fix the replacement part into place.  The picture shows use of the hose clamp tool -- it was a real frustration and time saver.

Finishing-up!


It was now I reached for my used coolant and spied a frog, dead and floating about.  I'm pretty sure my cooling system didn't contain any frogs, so this unfortunate amphibian hopped in overnight and couldn't make its way back out again.  I've heard that coolant was supposed to taste good, so much there's an additive to make it less attractive tasting to kids, I wonder other animals can't taste the additive or maybe my garage attracts less fortunate frogs.

Makes you wonder about the prevalence and abundance of life -- it's simply everywhere.  I wonder what bigger livestock has made its way into my garage when the door is left open?  Given the sheer number of deer, raccoons, groundhogs, turkey, squirrels, mice, owls, small children, pheasant, snakes, dogs, and cats spotted in an average week wondering about the yard, I'm betting an open garage attracts more wildlife than I want to know.

Tuesday, September 6, 2016

Disappearing Coolant

Coolant low light
I got a new light on the dash, this one for low coolant.  It seems like my car is the best test harness for warning light testing on the road today.

Checked the coolant reservoir and it was, in fact, empty, so at least I know the sensor's accurate.  But I didn't see a stream of coolant exiting the car.  The cooling system in a car is of the recirculating variety, so the coolant has just the following places to go:

1- Dripping out of the system
Maybe I did a poor job with the water pump and there's a leak.  But why am I not seeing a puddle of coolant?  Maybe the dripping is slow enough or it's making contact with something hot and evaporating?  But where's the steam? Could the leak be occurring at higher pressure, so when the car is stopped idling at slow speed, no leak?
2- Mixing with the fuel, going out the exhaust
This would be worse.  I'm not seeing the white smoke normally indicating this problem.  The oil looks good as well, this would be milky, as the water in the combustion chamber would mix with the oil causing it to look cloudy.  While I've never done a head gasket, this is the fix for this issue.

Better than out through the tail pipe
I went through about a gallon of coolant over a few hundred miles, each time, before filling, looking for a leak and I didn't see anything dripping.  Then, after a nice drive, I pulled into the driveway and found the coolant overflow reservoir yet again empty.  Looking down, my driveway revealed what was hidden to me so far: a nice deposit of fresh coolant.  Not much, so I know the leak is small, probably worse at speed, as this issue as cropped up as I've been taking the car out for progressively longer trips.

Not much of a leak, but enough...
The top of the engine around the water pump was dry, but under the car I see some drips from under the radiator support.  That's probably where we need to start looking.  When I purchased the car, the prior owner told me it was leaking from radiator, but this didn't seem to be a radiator leak, as this part was dry.

Corroded pipe
I filled coolant reservoir at the end of the day and the next morning it was empty.  There's a hose leading away from the reservoir and it joins with a metal "T" joint that looks to be in bad shape and leaking.  The T joint joins the overflow, bottom of the radiator and water pump inlet.  Why something that could corrode like metal?  The parts counter guy and I were discussing and we think it's due to the proximity to the exhaust manifold.  This makes sense.  The reason for using such an inferior material like regular steel probably boiled-down to cheapness on the part of Ford.

Here's a close-up from under the car.   I needed to remove the air dam, held in place by some 8mm bolts and those dastardly plastic screw rivets.  Once removed, I could get a clear line of sight on the problem.


The most leaking seems to be on the end of the pipe heading to the water pump, but the amount of moisture on the pipe itself seems to imply leaking from several spots or it has become porous.  I ordered a replacement (about $40 from FordParts.com, the "official" Ford site seemed to be the only place I could get this) and I should have things back together in a few days.

Tuesday, August 30, 2016

A Funny Thing Happened on the Way to State Inspection

My Freestyle's due for PA inspection.  In my county, I'm required to get both a "safety" inspection and an emissions inspection.  The Freestyle was in need of new front tires due to very poor alignment and problems with the outer tie rods, so I had that done at the same time.  I take my cars to a local, trusted mechanic -- his guys do a great job when I need repairs when I don't have the time, tools or ability to get them done myself.

My car was finished -- but the dead battery resulted in the engine not being ready for emissions inspection.  Apparently, the way dead battery resulted in the emissions information being cleared from the computer and I hadn't driven it enough for the engine to accumulate enough data for the emissions testing equipment. This problem was easy to solve, I just needed to drive the car a bit.

That Burning Smell

And that's where my troubles began.  As I rolled up to a red light, I could smell something burning and that's when, in the still morning air, I could see the smoke pluming from the right side of my hood.  And the smell, it wasn't oil, it wasn't electrical components burning it was... I just didn't know. So I parked it and headed off to work.  That night, when I started it, the battery light was on and no power steering. A little more riding around and the smell and smoking returned.

Sniff again.  I've oft heard smell triggers memories better than any other sense.  Thanksgiving's
Not the problem
melody of sage, rosemary and pepper, the cheap perfume cacophony of your grandmother's friends at her funeral, the scent of your wife's hair on your wedding day: just one whiff transports you there, like it was yesterday, like it was the present.  The scent of a car's electrical system self-immolation puts be back in 1998 when, with a toddler and a two-week old, a flashing check-engine light and a small puff of smoke preceded the one-alarm destruction of our trusty Mazda Protege.  This smell was similar, but new, and not the odor of impending flames. Maybe.

Overflowing Power Steering

Leaking power steering
reservoir
Once in the garage, I popped the hood and noticed first, the power steering fluid was leaking from the cap.  Then a close look at the accessory belt made it clear the source of the problems: it was broken.  The belt drives the alternator (resulting in the battery light) and the power steering pump.
Without the power steering pump running, the fluid overflows the reservoir and leaks over the top of the engine (according to the experts at myfordfreestyle), producing the burning smell and smoke.

Broken Belt
Removing the belt was easy enough, just grab it and pull.  But... before doing that, I made a diagram of the belt's route around the various pulleys. Since the belt was broken, I needed to guess a little, but with most of the belt in the right position, not much was left to the imagination.

The access to the front of the engine would be excellent if it not for an air conditioning line running over the top of the engine, so I don't think I could install the new belt from the top, I would need access from the bottom of the engine.  The next best way to get enough access to the pulleys would be through the wheel well on the passenger's side.  So up went the car and off came the tire.

Easy as 1,2,3!

Plastic Rivets: Defeated!

To get reasonable access to the pulleys, I would need to remove the inner fender, affixed to the car with my nemesis fastener. This time, I would not succumb to frustration and decapitate them, but I would figure out how to remove them -- there must be a way.

After a little futzing, I had an answer: slowly back out the screw, pry under the screw head to pull it away from the fastener base, then pull the fastener out by the base.  Some of the road grime made this a little difficult, but I managed to remove them all in this manner, saving me a few bucks at the auto store for a new set of fasteners.  Not sure if this is the "official" method of removal, but it worked.

As the Pulley Turns

Inner fender removed
Inner fender out and with access to all of the pulleys, I tested each to see if they spun freely, with the exception of the crankshaft pulley.  Alternator was OK as well as the power steering pump.  The AC however didn't want to budge and this was cause for concern.  If the AC unit's pulley froze, that would have broken the belt.  Depending on the AC unit, even if the compressor clutch is disengaged, the pulley takes more force to turn than expected.  I just hoped this wasn't the problem and went ahead with the belt installation, which lead to the next problem.

Belt diagram I made earlier
To install the belt, it looked like the plastic guard over the AC pulley needed to be removed. The bolts wore 8mm heads, easily reachable with an extension. Started turning, and turning when it became clear the bolts were stripped.  The bolts ran through plastic and the prior mechanic just kept tightening until the threads disappeared.  That means, I should have been able to apply some pressure to the back of the bolt and it would slip out, but for me, no luck. Strange. I tried wedging a screwdriver between the two plastic pieces secured by the bolt, no luck there either, this was sort of weird, I wonder what's holding that bolt in place?  When I reached for a cutting tool I knew it was time for a break. So I went biking with my kid on the Butler-Freeport Trail.  Did all 42 miles! 

Belt Installation, No Cutting Required

Looking at the problem with fresh eyes, I saw enough room to push the belt between the pulley and cover, using a prying tool to do the job. Then it was on to the rest working counter-clockwise: power steering, alternator, crankshaft and then a slack loop held by the tensioner. 

Getting the belt around the the camshaft and tensioner proved to be somewhat difficult.  The tensioner is a pulley on a spring, that applies force to keep the serpentine belt taut.  When changing belts, you need to push against the tensioner's spring that effectively reducing the length the belt needs to travel, giving slack for installation or removal. I have a tool designed for this purpose, a 1/4in square drive end on a thin piece of metal.  I drafted my youngest kid to apply force so I could loop the belt over the tensioner and camshaft, but the new belt was tight enough that I needed to use the back my pry bar to slip the belt over the crankshaft pulley. Done!

Mark on AC pulley
Fired-up the car, and listened for the squeal of a stuck belt.  Turned-on the AC, heard the clutch engage and the extra load on the engine, no tell-tale stuck-belt squealing.  Just to make sure, I stopped the engine and put a little whiteout mark on the AC pulley so I could see if it turned.  Engine running again and white dot gone, I convinced myself the old belt just wore-out at an opportune time.

Put the inner fender back into place, with some satisfaction that I was able to re-use the fasteners and back on with the tire.  Took the car out for a few rides, let's hope it has enough miles for the emissions test to be run.