Showing posts with label easy. Show all posts

Saturday, February 10, 2018

Lift gate, minor issue, fixed!


Owning a cheap car means compromising with various things sort-of-but-not-entirely working.  You don't drive the car, you negotiate travel to your intended destination.  Anyway...

The lift-gate on my Freestyle was catching on the black, plastic trim.  The work-around was to push down on the trim when opening the lift gate to avoid the extra bit of effort needed to overpower the bit of plastic interfering with the operation of the rear lift-gate.

Not a big problem, but enough of a problem for me to spend 15 minutes to fix it.  Repair involved removing the panel, cleaning away the dirt caught underneath, fixing the fastener so the trim stayed seated and putting the trim back.

Tuesday, February 21, 2017

Lift supports installed

Maximum package, minimum product
My new lift supports were purchased from RockAuto and shipped to me thusly.  Seems like a lot of box for not that much product.  Padding?  The padding was placed atop of the product, so it contributed to the protection of just 1/6 of the product's surface area.  The cardboard box did the rest of the work in terms of keeping things from arriving crushed.

Smurf entrails
Seeing such a wasteful way to ship products reminds me of how much it must cost to be more efficient.  Guessing that warehouse guys at RockAuto fulfilment have just a few sizes of boxes, stocking more would be more expensive than the waste of a 1/10th filled, but larger box.  RockAuto seems to be the greatest offender in the box to product waste, with Amazon being a close second.

Monday, October 31, 2016

Happy Halloween! Fixing the Fan Speed Control

Boo!
The Freestyle has passed an important milestone in my household.  Not in dollars spent or miles driven, something more substantial.  My wife likes the car enough to start decorating it.  At first, she refused to be a passenger, in fear of an immediate breakdown or immolation (I feel the need to point out I spelled that word correctly the first try), but after seeing it not stranding me the last few months, I think she's warming up to our newest car -- plus, I think it keeps me in the garage and out of her hair.  I'm told this car is "cooler" than our minivan; which I don't understand because our minivan has a TV.

Fan Control

I'm on to fixing the AC system and part of the job is fixing something that didn't work from day one of my ownership experience: the fan speed control.  The controls offered two options: nothing or high.  Not a big deal, maybe an annoyance at the most.  Once the AC has been recharged (I've replaced all of the parts, just recharging the system remains!) it will be nice to have some control; same for the heat in the looming winter.

Replacing the part was easy enough.  On the passenger's side, slide the seat all the way back to give yourself room to work.  Then, remove a panel covering the fan by pulling out two plastic rivets:

The part in question can be found close to the firewall and center console.  Remove the wiring connector, spin out the 8mm screws.  The part will just fall out.

There's not much clearance and I found the wiring kept getting in my way, I tucked it into the center console.  Insert the new part, making sure it's oriented with the connector release facing you, the connector has some pegs to ensure a correct fit -- there's two screws and two alignment pegs -- twist things back up to "hand tight" and that's about it.  The wiring connector will fit only one direction and returning the protective cover involves pushing the plastic retainers back into place. Done!

The malfunctioning fan is a common failure, the part at fault being the fan speed resistor, which regulates the amount of electricity to the fan, which then controls how fast the fan spins.  This this part works by restricting the flow of electricity, that extra energy become heat, explaining why this component can be found close to the fan it controls, as that provides some cooling.  In this part of the world, something hot will condense the moisture out of the air, which probably contributes to the part's demise.

Old part, note bubbling
Coating the part with some moisture-resistant material performs the important job of keeping wiring on the part from making contact in such a way a short-circuit occurs, which looks like what happened on the failed part.  Notice the bubbling close to the connector, it looks like some water worked its way under the coating; guessing the heating and cooling cycles resulted in the coating separating from the sub-strait thus spoiling the circuitry.

A Small Find

Found the Owner's Manual!
When I removed the panel covering the fan, out fell the original owner's manual for the car and a black Aldi job application.  I'm guessing the book fell from an overloaded glove compartment above.  For the first time I think ever, I needed to consult the owner's manual to find the neutral override switch and needed to use Ford's (excellent) on-line manual service.  While I might never look at it again, It's nice having the owner's manual for completeness's sake.  I'll give the job application to my youngest kid so nothing goes to waste.

Tuesday, October 18, 2016

Seat Handle


My Freestyle came with a broken seat recliner handle. The seat has motors to move it fore and aft, but reclining the seat is a manual affair in my trim level and the handle that did this was broken.  The recline of the seat was a bit more than I would have liked, I could have lived with it had I no choice, but I did have a spare $17 to put into additional driver comfort.

This seemed to be an easy fix -- get a new handle, push onto axle, call it a day.  Getting the new handle was the slightly more expensive than anticipated, as I couldn't find an after-market part via mail order that I knew would fit.  Even "hassle free" mail order returns seem to have some level of hassle.  

I would need to contact a Ford parts dealer, so I used my standby Tasca Auto Parts. Plugged in my VIN and a few clicks later, my order was placed.  A few days later, the part arrived at my door and I was even surprised the color matched.  Must have been color information encoded in the VIN, as I didn't make a color selection when picking the part.  I wouldn't have fussed about the color as long as it worked, but it's nice that it matches.

Worth noting that bag says "Majority Content made in USA".  Considering the bag contains one plastic, injection moulded part, I'm wondering what minority content was from outside the good-ol-USA.  This wording was probably carefully selected as a result several meetings at the legal department whose job it was to approve what appears on product packaging.


Here's the old and new parts.  The part broke in a predictable place given how it's used.  Installation was super easy, line-up the handle so the key was oriented correctly and press.  That's it.  I'm now much more comfy as I head down the road.

Wednesday, July 13, 2016

Cleaning Throttle Body

While taking things apart to fix that torque bushing, I removed the throttle body,
Close-up of dirty throttle body
held on by four 9mm bolts to get access to the bolts holding the torque arm in place.  It looked dirty. In the extreme close-up, notice the tar deposits on the top and bottom of the flap. Figuring things work better when clean, although I really don't have proof of such a hypothesis, I decided to remove the gunk before re-installation.  Cleaner specifically for this task exists, so that's what I used.

The Cleaning Job

Throttle body cleander
Clean!
Completely removing the throttle body from the car made cleaning both sides a snap.  I'm not sure what comprises throttle body cleaner, but it melted away the plaque deposits on contact and probably reduced my lifespan by three to six weeks.  Wiped the run-off away and that was it.

If the part wasn't off the car, cleaning would have been much more difficult, as I would have needed to hold the spring-loaded flap open during the process so I could clean both sides.  The part went back on the car when reassembling the rest of the air intake system.  The four bolts were tightened to "hand tight".

2006 ford freestyle throttle body
Clean too!

Can't really be sure if this made or will make a difference in performance or fuel economy. Maybe the throttle will turn a little easier as I've removed some of the gummy material from the pivot points, so that actuator won't have to work too hard to reposition the throttle.  Since a spring pushes the throttle closed, that won't have to work as hard when closing the throttle.

2006 freestyle intake manifold dirty
Rest of intake dirty...
What was still very dirty was the intake itself.  I tried to clean this a little with just a rag, but I think, like the throttle body itself, removal first would yield the best results. Just inside the intake was a sensor, I didn't want to contaminate that with cleaner that could cause damage.


 Two observations worthy of note

  1. This is a "throttle by wire" car
    A set of electrical wires controls the throttle, there's a servo in the throttle housing to create the force to overcome the spring and open the flap to increase air flow. No mechanical connection between the driver and the device feeding air to the engine. I would bet the engine management software decides how much to open the throttle, the position of the accelerator pedal being just one of the factors in the decision-making algorithm.
  2. The spring-action of the throttle will result in closure by default
    This is design for graceful failure, I would guess.  The mechanical spring will force the throttle closed by default, so if the actuator in the throttle fails, the lack of air will result in the engine stalling, which seems to be the safest of alternatives.  A neat, fail-safe, design.
I'm not sure how to assess a cost, as I already had the cleaning chemicals on hand and I'm not sure how to account for few paper towels.  For tracking purposes, let's say the cost approximated zero.  RepairPal says this would cost about $200, labor being the biggest factor in the price. This was an easy job, something to consider tackling on your own and saving those two Benjamins for something else.

Wednesday, July 6, 2016

The Forgotten Oil Change: Brake Fluid

Thanks makeameme.org
When replacing the brakes, many (let say most?) home mechanics overlook doing the same for the brake fluid.  Brake fluid works hard and needs to be replaced with fresh fluid in order to get the best stopping performance.  Over time, brake fluid absorbs water from the atmosphere and becomes less effective -- the contaminated fluid can be compressed more easily this diminishing the efficacy of the brakes.  The extra moisture in the system will also cause problems for the braking lines, causing them to rust from the inside out.  All not good!  I inspected the brake lines on my Freestyle, but if the deterioration is happening on the inside, there's not much to see from the outside until the leaking starts.

Brake fluid costs about $8 for a large bottle, so why not replace that well? I'll tell you why: bleeding brakes is a bit of a pain and messy and there's the fear that it will be done completely wrong causing massive brake failure at an unpredictable time resulting in the car careening off the road, hitting an embankment and erupting into a giant fireball.  Or maybe it's just messy?

Out with the old


2006 ford freestyle old brake fluid
Looks like it was never changed
Several specialized tools exist for extracting the used brake fluid from the master cylinder, the one shown in the picture happens to be a turkey baster from the dollar store.  Not the greatest tool, but cheap and disposable. The fluid is... groady.  New brake fluid looks as translucent as light veggie oil.  What I see here looks like over-worked oil I've drained from vats while working as a teen-ager in fast food. Ewwww.  The picture just doesn't convey the abhorrent condition of the liquid, it's both brown and green with what looks like algae floating about -- give it another three months and we might have a new life form on our hands.

In with the new

2006 ford freestyle suction brake bleeder
HF suction brake bleeder
The replacement procedure is easy.  You'll need a way to catch the old fluid, I happen to have a HF special vacuum pump operating by my small (but powerful!) compressor.  Even though the vacuum draws the fluid, I still speed the process by having somebody push the brakes while using suction.

Start from wheel the furthest from the brake fluid reservoir, remove the dust jacket from the bleeder, give the bleeder a turn with a socket or wrench (11mm in my case) and some of the liquid will just start dripping out, attach the bleeder hose and have a buddy pump the brakes. When the fluid's clean, tighten the bleeder; just to make sure that I don't let air seep back in, tighten the bleeder while the vacuum is running; you can get the same effect by tightening the bleeder when your buddy is pushing in on the brake peddle.

2006 freestyle no caliper
Catching brake fluid
For this car, when the rear caliper was detached from the car when doing the brakes, I took the liberty of letting the fluid drain from the brake hose into a spare oil bottle. I still had to do the bleeding process, as the re-attached caliper contained both air and some old fluid, but since most of the old fluid drained out of the lines, the new fluid was visible in just a push or two of the brakes.

All that's left to do replace the dust cover, top-up the brake fluid and move to the next wheel in the rear.  Repeat again on the front wheel farthest from the master cylinder and then the remaining wheel.  Removing the wheels and lifting the car is the hardest part of the job.  I have the habit of lifting just one wheel at a time when I can, because that is the safest approach, keeping as many wheels in contact with the ground as possible.

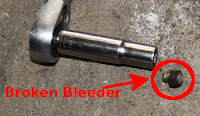
Broken Bleeder


Decapitated bleeder
2006 freestyle broken bleeder
Bleeder screw that broke
Consider using some penetrating oil on the bleeders so they turn without incident.  Sometimes, the bleeders can break off, as they're essentially a hollow bolt. This happened on the front driver's caliper.  Having some other chores to do, I left well enough alone, when I get the chance, I'll pull out this bleeder and replace it, but that's another project and post.

Disposal 

Brake fluid is not motor oil, so don't secretly dump it in the used oil vat of your local reclamation center.  Please bring it to your area's hazardous waste collection center for proper disposal.  We all live here, so do the right thing.

Saturday, May 14, 2016

Side mirror

Mirror, broken, missing decorative cover
When I purchased the vehicle, the driver’s side mirror was broken.  The prior owner (PO) parked it on the street and, and on his street at least, careless drivers/vandals would break the mirrors on parked cars frequently.  Oddly, the PO had bigish driveway, so I was wondering why he just didn’t park the car there?  I also looked down the road to see many other cars parked on the street with all with intact mirrors. Maybe the mirror was broken some other way and this just seemed like the easiest explanation to a prospective buyer.  No matter how it got broken, in order to pass PA inspection, this needs to be fixed.

Hidden bolt
As far as repair jobs go, this was a breeze, no more than 15 minutes.  I used some nylon prying tools from HF to un-clip the interior, removed the wiring harness, and then I unwound the two 11mm bolts attaching the mirror to the door and then... something was keeping it attached. I pried a little and it didn’t feel like a clip.  So I got the new part and saw three studs and realized that I had one more bolt to remove in the forward section of the door and, after a little pressure to overcome a clip, the mirror was free.

Nylon, non-marring, prying tools
As you can see from the state of the tools, I find myself reaching for these little pry bars frequently.  Since they're soft plastic, they bend a little, making it harder to damage what ever you're prying and the blades don't scratch metal/paint and other surfaces.  They're stronger (haven't broken one yet!) than the look and feel too.

Electric mirrors (both driver and passenger) seem like standard equipment today, I haven’t seen a car equipped without them in I can’t tell you how long.  In fact, mirrors on both sides of the car weren’t always standard equipment.  I remember back in the early 90‘s getting a quote on a Honda Civic, that went something like this:

Sales Critter: So, you want side mirrors, right
Me: Yes
SC: Both of them?
Me: Uh... Yes?
SC: How about a radio?
Me: Sure
SC: And an antenna?
Me: (raises eyebrows)
SC: That’s extra. (scribbles numbers on four-corners sheet)

During the height of Honda-mania, it wasn’t uncommon to see base (DX) Civics without passenger’s side mirrors, the buyer trying to save a buck or feeling fleeced during the order-taking process that was buying a Honda at the time.  Electric mirrors were reserved for higher-level (LX) trim cars -- but I’m sure the dealers found a way to charge separately for them.

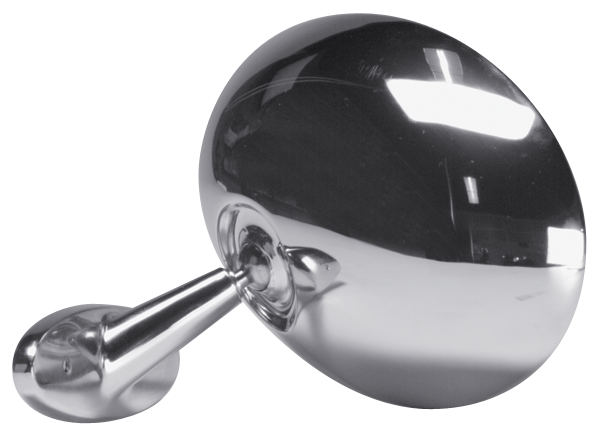
Ye olde timey mirror,
thanks www.yearone.com
There was a difference between “remote” mirrors and electric mirrors.  Remote mirrors were cable driven, electric mirrors were found on higher-end “fancy” cars.  Most of the time, the external mirrors rested on a ball and adjustments were remote in a different way: you told whoever was in the passenger seat to wind-down the window and supplied instructions.  For $500 in the late 80‘s/early 90‘s your beater didn’t have electric mirrors, but might have had cable operated remote mirrors, but most likely had something hand-operated.  I wouldn't be surprised if just the electric mirrors alone on an 90's vintage car added five Benjamin's to the price when new.

New mirror installed
Installing the new mirror was as easy as lining-up the studs, engaging the clip
and tightening the bolts.  The interior trim then snapped back into place. The part for this job cost about $60 from Amazon and it fit perfectly.  Done!