Entrapment. My top fear, right after heights and too thick (or thin, for that matter) a glaze on my creme brulee. No matter what I do to ensure my car is properly lifted and secured, there's a nagging fear in my head my repair work will end tragically, where my last sight is the under-body of a Ford Freestyle before my demise; at least I will have the happiest widow in the tri-county area.
Lifting the rear of the Freestyle requires more forethought, because there's not a good lift point aft of the front door where I can fit a jack and then a jack stand to bear the weight while I'm working. To lift the car, I jacked the front enough to lift the rear tire off of the ground and then placed a jack stand at the rear of the car on the unibody rails where one would put a scissor jack whilst doing a road-side tire swap-out.
Once the wheel was off, the sensor was nicely exposed and I had (just!) enough clearance to do what I needed to be done.
Showing posts with label repair. Show all posts
Monday, April 2, 2018
Saturday, February 10, 2018
Lift gate, minor issue, fixed!

Owning a cheap car means compromising with various things sort-of-but-not-entirely working. You don't drive the car, you negotiate travel to your intended destination. Anyway...
The lift-gate on my Freestyle was catching on the black, plastic trim. The work-around was to push down on the trim when opening the lift gate to avoid the extra bit of effort needed to overpower the bit of plastic interfering with the operation of the rear lift-gate.
Not a big problem, but enough of a problem for me to spend 15 minutes to fix it. Repair involved removing the panel, cleaning away the dirt caught underneath, fixing the fastener so the trim stayed seated and putting the trim back.
Thursday, January 18, 2018
Flex pipe fun - pt2
![]() |
| Rusted flex pipe |
Because I had cut away some of the connecting surfaces, there was a little more work than just twisting the nuts/bots the opposite direction and calling the job done.
Here's what I needed to do:
- Replace the flange to the cat converter on the back end-of the y-pipe.
- Attach the fronts of the y-pipe to the existing plumbing.
Saturday, January 13, 2018
Flex pipe fun - pt1
It's been a while since my last dispatch. The Freestyle hasn't been on the road for the last six weeks due the following:
- The exhaust was leaking, this needed to be fixed for PA state inspection
- Things have been nuts on the home front, preventing me from tackling item #1
- Christmas! I took some time to bake cookies (from the excellent Christmas Cookie Book from J. Knipe and a few of my own concoctions I stash in the front material)
- Some work travel
- Other stuff, I won't bore the reader.
Tuesday, February 21, 2017
Lift supports installed
![]() |
| Maximum package, minimum product |
![]() |
| Smurf entrails |
Thursday, February 9, 2017
Lift Supports and Punch Cards
Technology has a habit of hanging around well past its welcome, like a dinner guest who, despite their empty wine glass and the clatter of dishes being cleaned lingers until being handed their car keys.
To the left is a punch card with an VIN, Vehicle Identification Number. All cars produced since 1981 must be uniquely identified with a standard VIN which means there must be some agreement as to what constitutes a VIN, and such a thing exists at ISO 3833. Wikipedia contains a reasonably good description of the standard if you don't want to shell-out for
![]() |
| Last model year: 2012 |
Tuesday, December 6, 2016
Torn seal, failed water pump, back on the road
![]() |
| Oil from torn seal |
Having replaced the very same seal before, I wasn't at all intimidated this time around. Out came the seal puller and in one swift hand-motion, I lost my grip and whacked the back of my hand against the radiator. I was wearing my gloves, but they don't offer much protection for the back of the hand and it seems that's the most sensitive part. A little more fiddling and out came the seal.
![]() |
| Torn seal |
The tearing was complete, a replacement was necessary. Getting a clear picture wasn't easy, because it was difficult to keep the background and foreground in focus, but here it is over on the left. While the old seal apparently wore so that it wasn't keeping a tight grip on the camshaft, this one was completely compromised. Just like the last time, I put a thin coat of oil on the seal and worked it over the camshaft, using my Craftsman Seal Seating tool (right) and a few taps from a plastic dead blow hammer to make ensure the seal was seated.Re-attaching the water pump
![]() |
| New pump installed |
All back together, recycling the coolant
When I took things apart, I used a basin to catch the coolant fluid in hopes I could use it again and not have the hassle of taking it to the disposal center (c'mon, we don't put chemicals like this down the drain, that would be uncivil) whilst saving a few bucks. Before pouring the coolant back in the car, examination showed bits of dreck floating about, dreck I'd rather keep on the outside of the cooling system. My solution was to put a coffee filter in the funnel and have that catch the chaff; however the filter was a bit too fine and I was a bit too impatient.
The filter was replaced by a paper towel, and in about 10 minutes, all of the captured coolant was back in the system. I was thinking that the ethylene glycol molecule's size was the cause of the poor flow through the filter, but I was wrong by a factor of 1000. Our friend C2H6O2 is about half a nanometer and a the average pore size of a coffee filter is about 50 microns, so the chemical should have passed through like a bee through an open window, or air through a residential screen, even if some of the molecules clung together in the filter's mesh. The slow speed was probably the filter doing it's job removing nasties from the fluid.
I thought I was being paranoid with the filter, but here's a picture of what remained in the pan after filtering. And, yes, the pan was clean before it caught the fluid. When pouring the liquid into the filter, I was careful not to disturb the sediments, as I didn't want the filter to break, or more likely, clog.
Job being done, I'm hoping that two's a charm when it comes to water pumps. It's been about 200 miles on the new pump with no problems, so I'm not worried about the torque of the impeller bolt, or at least I'm not worried that much.
Sunday, December 4, 2016
Water Pump, Encore!
When your correspondent last wrote, my Freestyle stranded me on the way home from the Pittsburgh
airport. Something in the cooling system failed (I was guessing the thermostat, which turned out to be half true!) and when I tried to slowly return home, stopping to let the engine cool, my wife guilted me in calling a tow truck and having her meet me for breakfast. I came to a stop at King's, a chain started by Hartley King, an offshoot of his fuel distribution business. Kings always played second-fiddle to Pittsburgh's dominant family chain "Eat 'n Park", despite having both better breakfast and desert menus. For years, as a counter to Eat 'n Park's "Smiley" cookie, King's had the Frownie -- a stroke of marketing brilliance to counter the Smiley -- a brownie with a no-so-menacing frown. But it went deeper than the frown: the earth-tone brownie matched the Kings décor to the tee, the fudgy bites were more substantial than the nearly flavorless Smiley cookies, like the food at Kings versus E'n'P. Kings has since been purchased by some outfit on the west coast and is losing it's quirkiness, the menu isn't on the placemat anymore, the Frownie retired to mascot Florida and decidedly 70's faux wood Formica décor replaced by cleaner and brighter tiles and paint.
I didn't have the chance to look into the problem that day and some home things kept me from tearing into the engine for about a week. When I did get to seeing what was happening, I had the following suspects, in my order of probability:
Off came the water pump. Flipping it over, I see oil leaking from the weep hole of the pump.

Then, it can back to me... When I was pulling out of the airport, I heard a squeaking/grinding noise, I that was this part of the pump breaking and being reduced back to the metal powder from which it was formed, in the process tearing the seal around the camshaft, permitting the oil into the pump shaft. Here's what the seal looks like in the engine:
At this point, I needed to replace the water pump and seal. But the thermostat was OK, right? No it wasn't, so that will need to be replaced as well. What makes this more frustrating is my smugness over having the luxury of time to do the research and wait for delivery. At least I have practice!
![]() |
| Frownie |
I didn't have the chance to look into the problem that day and some home things kept me from tearing into the engine for about a week. When I did get to seeing what was happening, I had the following suspects, in my order of probability:
- Blockage in radiator
This would keep the coolant from flowing, since I was not getting heat in the cabin, this would sort of make sense, but I would have expected some coolant flow from the engine to provide some heat. - Thermostat valve failure
I replaced this already, but it could have been the problem, maybe a discount part failed? - Water pump
Least likely, since it was just replaced.
I'm thinking #1 as the problem, since I replaced the thermostat and water pump. But, the nature of the symptoms (over heating engine, no output from heater) lent itself to being a failed water pump, despite it being replaced just a few months back. I started by removing the various pipes from the cooling manifold (using a basin to catch the fluid) and to my surprise, saw some fresh oil dripping on the starter, along with a whiff of the "oil and coolant" smell. Something interesting is afoot, just not sure what.
![]() |
| Note oil drip on starter... |

This was odd, because water pumps shouldn't contain any oil. Then, on close inspection of the part, the nature of the problem became more obvious, looking closely where the pump interfaced with the cam shaft:
Then, it can back to me... When I was pulling out of the airport, I heard a squeaking/grinding noise, I that was this part of the pump breaking and being reduced back to the metal powder from which it was formed, in the process tearing the seal around the camshaft, permitting the oil into the pump shaft. Here's what the seal looks like in the engine:
At this point, I needed to replace the water pump and seal. But the thermostat was OK, right? No it wasn't, so that will need to be replaced as well. What makes this more frustrating is my smugness over having the luxury of time to do the research and wait for delivery. At least I have practice!
Monday, November 7, 2016
Overheating and stranded
I was out of town for most of last week, at a company site in CA. When I travel to our offices in California, I usually take the early AM flight Monday from PIT to SFO and drive to San Jose. This flight is usually at 100% capacity. However, this week, I departed on a Tuesday and found myself in a row with an unoccupied middle seat, and on the way back on the red-eye Friday, same seating arrangement! Unusual. What was also unusual was the pair of basset hound "emotional support" animals waiting to board the plane I just departed (was too tired to get a picture, sorry!) on Saturday morning. We have a basset hound, they're great dogs, but they smell, shed and drool more than the average traveler. While the bassets display excellent temperament, they tend do want to do their own thing and will put their weight into getting their way, so I can't imagine one being on a lap and compliant for even a short flight.

When I returned to airport lot, I jumped into the car and made it about 5 miles down the highway to discover the engine heat climbing. I also heard a bit of a weird noise coming from the engine, a high pitched whine. I stopped on the highway's shoulder, let things cool-off then got off the highway and stopped again at a gas station, then at a McDonalds, Rite-Aid, Golf course -- each time the temperature made it too close to the red-line for me to be comfortable. After 2 hours, traveling about 18 miles, I stopped at the King's in Monaca called my wife to meet me for breakfast and then AAA for a tow home.
I didn't want things to get too overheated, as that could cause the a head gasket to break or worse, the block to crack. Since I hadn't called AAA in a while for a tow and I wasn't that far from home, this was covered under the cost of my membership.
By this time, I was tired and just a little more than frustrated. This would be the first time the car left me stranded. At least I was close to home and could easily get to help. But still.
There's a few things this could be:
Despite the car problems when I got home, the trip was great. One of the great things about the San Jose area: all of the great food around the area! The people at the office might think the various Korean hot pot and Pho places are pedestrian, but it's a delightful culinary break for me. One of the new things I tried was persimmon, a crisp fruit with what I can describe as a sweet, crunchy pumpkin taste. There's a much musher variety of persimmon as well, but the firm variety makes for the best out of hand snacking. Can't find any in these parts, so I'll have to bring more back from my next trip.
Overheating

When I returned to airport lot, I jumped into the car and made it about 5 miles down the highway to discover the engine heat climbing. I also heard a bit of a weird noise coming from the engine, a high pitched whine. I stopped on the highway's shoulder, let things cool-off then got off the highway and stopped again at a gas station, then at a McDonalds, Rite-Aid, Golf course -- each time the temperature made it too close to the red-line for me to be comfortable. After 2 hours, traveling about 18 miles, I stopped at the King's in Monaca called my wife to meet me for breakfast and then AAA for a tow home.
I didn't want things to get too overheated, as that could cause the a head gasket to break or worse, the block to crack. Since I hadn't called AAA in a while for a tow and I wasn't that far from home, this was covered under the cost of my membership.
By this time, I was tired and just a little more than frustrated. This would be the first time the car left me stranded. At least I was close to home and could easily get to help. But still.
There's a few things this could be:
- Water pump
The engine was overheating because coolant wasn't circulating through the system. - Thermostat
Coolant was being blocked from flowing through the system, resulting in poor cooling. Maybe not the problem, in many cases the coolant will still circulate through the heater core before the thermostat opens... But I wasn't getting heat, so maybe not. - Radiator
A blocked Radiator can result in decreased cooling efficiency. - Coolant leak
Could be a problem... But I found that the system contained lots of coolant and the cooling system was under pressure, so I think I can cross this one off the list.
Recall, that I replaced the water pump and thermostat already. Could one of the new parts failed? It would seem so, but that would be a real bummer. There's some interesting things of note I'm mulling over:
- Heater wasn't working. This could mean a the pump was not circulating the coolant or the thermostat wasn't opening to let the water circulate through the heater core
- A squeaking noise was heard as I was exiting the airport. I thought it was the wheel, but maybe the water pump?
I have some yard work to do, so won't be able to tackle this problem in the next day or two. Considering these parts have been replaced once already, I'm not that happy about having to do the job again.
Despite the car problems when I got home, the trip was great. One of the great things about the San Jose area: all of the great food around the area! The people at the office might think the various Korean hot pot and Pho places are pedestrian, but it's a delightful culinary break for me. One of the new things I tried was persimmon, a crisp fruit with what I can describe as a sweet, crunchy pumpkin taste. There's a much musher variety of persimmon as well, but the firm variety makes for the best out of hand snacking. Can't find any in these parts, so I'll have to bring more back from my next trip. Monday, October 31, 2016
Happy Halloween! Fixing the Fan Speed Control
![]() |
| Boo! |
Fan Control
I'm on to fixing the AC system and part of the job is fixing something that didn't work from day one of my ownership experience: the fan speed control. The controls offered two options: nothing or high. Not a big deal, maybe an annoyance at the most. Once the AC has been recharged (I've replaced all of the parts, just recharging the system remains!) it will be nice to have some control; same for the heat in the looming winter.Replacing the part was easy enough. On the passenger's side, slide the seat all the way back to give yourself room to work. Then, remove a panel covering the fan by pulling out two plastic rivets:
The part in question can be found close to the firewall and center console. Remove the wiring connector, spin out the 8mm screws. The part will just fall out.
There's not much clearance and I found the wiring kept getting in my way, I tucked it into the center console. Insert the new part, making sure it's oriented with the connector release facing you, the connector has some pegs to ensure a correct fit -- there's two screws and two alignment pegs -- twist things back up to "hand tight" and that's about it. The wiring connector will fit only one direction and returning the protective cover involves pushing the plastic retainers back into place. Done!
The malfunctioning fan is a common failure, the part at fault being the fan speed resistor, which regulates the amount of electricity to the fan, which then controls how fast the fan spins. This this part works by restricting the flow of electricity, that extra energy become heat, explaining why this component can be found close to the fan it controls, as that provides some cooling. In this part of the world, something hot will condense the moisture out of the air, which probably contributes to the part's demise.
![]() |
| Old part, note bubbling |
A Small Find
![]() |
| Found the Owner's Manual! |
Tuesday, October 18, 2016
Seat Handle
My Freestyle came with a broken seat recliner handle. The seat has motors to move it fore and aft, but reclining the seat is a manual affair in my trim level and the handle that did this was broken. The recline of the seat was a bit more than I would have liked, I could have lived with it had I no choice, but I did have a spare $17 to put into additional driver comfort.
This seemed to be an easy fix -- get a new handle, push onto axle, call it a day. Getting the new handle was the slightly more expensive than anticipated, as I couldn't find an after-market part via mail order that I knew would fit. Even "hassle free" mail order returns seem to have some level of hassle.
I would need to contact a Ford parts dealer, so I used my standby Tasca Auto Parts. Plugged in my VIN and a few clicks later, my order was placed. A few days later, the part arrived at my door and I was even surprised the color matched. Must have been color information encoded in the VIN, as I didn't make a color selection when picking the part. I wouldn't have fussed about the color as long as it worked, but it's nice that it matches.
Worth noting that bag says "Majority Content made in USA". Considering the bag contains one plastic, injection moulded part, I'm wondering what minority content was from outside the good-ol-USA. This wording was probably carefully selected as a result several meetings at the legal department whose job it was to approve what appears on product packaging.
Here's the old and new parts. The part broke in a predictable place given how it's used. Installation was super easy, line-up the handle so the key was oriented correctly and press. That's it. I'm now much more comfy as I head down the road.
Tuesday, October 4, 2016
Aww, Snap!
Belts fail due to the following reasons, and primarily the first two
- Age
They're rubber + nylon, so after a while, the rubber and/or reinforcing material breaks down, causing the belt to come apart. Belts in this state can be described as "crispy" as the rubber looses pliability. - Pulley Problems
The belt rides over a number of pulleys to transmit the force of the crankshaft to other components. Problems such as poor alignment, wiggling (float), or a stuck (frozen) pulley will break a belt. - Obstruction
Stick + belt = broken. This is unlikely, but so is winning the lottery, and there's probably hundreds of lottery winners every day.
Proper Diagnosis
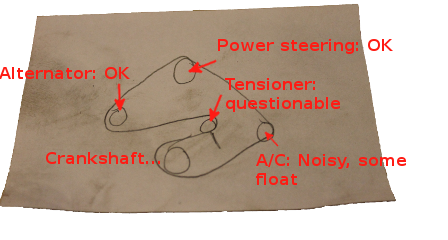
In my case, since the belt was new, #1 was ruled out, but number 2, well that's probably the problem. I checked the pulleys before replacement, here's my findings:![]() |
| Annotated Belt Diagram |
The tensioner pulley was as stiffer than an old man's back and the AC pulley was noisy and presented some float. Float, in this sense, is when a pulley moves perpendicular with respect to its axle. I decided to take a chance a replace the tensioner: firstly, it was cheap (sub $10) and considering it looked the age of the car, I wasn't surprised it wasn't rolling quietly and smoothly. The next possible problem would be the A/C pulley, the float causing the belt to be incorrectly aligned and come-off the pulley, but that would be considerably more expensive, so lets start with the cheap fixes first.
Replacing the Tensioner Pulley
![]() |
| Lots of room to remove part |
There's two other pegs (circled) on the tensioner to hold it in place, once mounted to the engine. This is neat design in that the tension cannot be incorrectly mounted and, at the same time, can be held in place with just one bolt, saving assembly time. As with the rest of the engine bay, the part was covered in oil. I'm sure that I'm leaking from the valve covers, and/or the cover over the timing chain and/or the camshaft seals. More leaks than an onion farm. As long as I don't have a puddle in my driveway, that's a problem for a different day.
![]() |
| New (l) and Old (r) |
![]() |
| Reassembled and much cleaner |
Re-assembled and the part was ready for re-installation. Considering how easy this change was to do, I should have done it when replacing the belt the first time around.
I'm happy that I took pictures as I went along, as I didn't know in which direction to install the new pulley -- but since I had a picture of the part right after removal, knowing what to do was easy.
Rattling Continued until it Stopped
Installed the belt, nothing notable there. Fired-up the engine and it ran just fine. But the A/C pulley was still rattling. Figured this was OK, drove the car for about a week and the A/C pulley became louder, developing into a legitimate, full-blown racket. The noise finally went away when the replacement belt broke, so I know what needs to be done to fix the root cause of the problem. I've never done any work on an A/C system, so this should be a learning experience.
Sunday, September 25, 2016
Disappering Coolant: Fixed!
My testing harness for dashboard warnings lights, which, incidentally can be used for transportation, presented me with a coolant low light. And, in fact, the coolant was low, so the sensor was accurate. (I've always been a little frustrated when the first response to an irregular reading from a sensor is to replace the sensor itself rather than the problems being reported by the sensor.) The next question was, where was it going? A little investigation revealed it was leaking out of a pipe that ran along the bottom of the radiator, connecting the overflow tank to the radiator and pump. This was less of a mechanical problem and more of a plumbing problem.
I was disappointed in myself because I saw this dodgy pipe while fixing the water pump and thought to myself: "If it's not broke, don't fix it" and just because it looked dodgy didn't mean it actually was dodgy. I'm guessing that once the system was running at proper pressure, a weakness in the pipe developed into a leak. Mechanical systems seem to wear as an entire system, so replacing a part exacerbates the wear in others. After replacing this pipe, the next-weakest part of the pressurized cooling system are the hoses, then radiator and then the engine block itself.
Locating the part itself was a bit of a hassle. It was only available directly from Ford -- but when you order from Ford you effectively get overnight delivery to a Ford dealer and it so happens there's one just on my way to work.
To do this job, I got a new toy^Wtool. It's a tool specifically designed to open the clamps on radiator hoses. It was about $18 on Amazon and a bargain at twice the price. I figured I would need to remove and replace at least six clamps, and some were not easily reachable. Having the wired extension made removing the clamps easy in that it was able to open them enough to have the stop tab keep them open. After opening the clamps, removing the hoses was remarkably hassle free. Without this tool, it would have been much more of a struggle.
With all of the clamps opened, I removed the lower hoses, careful to catch the coolant still retained in the system. About another gallon of coolant exited from the bottom of the radiator. Even with my fancy tool, I had trouble reaching the clamp on the lower hose, so I unhooked the oxygen sensor and pulled the pipe still attached to the coolant return hose upward, looking as though I disemboweled my Freestyle. The last hose clip could now be reached with ease.
test, I would be surprised if this didn't hold the rubber to the pipe with enough pressure, resulting in yet another leak. With very little effort I was able to pull the two parts of the clamp away. The nice straight seam in the metal was a bit odd in that I didn't see anything the fitting was resting upon to cause this indentation.
The pipe's integrity was greater than anticipated, as I expected the pipe to simply collapse into pieces, or fracture where they meet the rubber hoses. Instead, I needed to scrape a little to find the problems: in two places the rust gave away to expose holes in the pipe. For comparison, I've included a side-by-side picture of the old part and its replacement.
I'm going to guess enough metal remained to hold liquid at STP but not at running conditions. With the system no longer leaking at the water pump, the system was under much more pressure than before, thus forcing the liquid out while the car was running. The leaking had also corroded one of the hose clamps, reducing it's ability to hold under pressure as well.
I got everything taken apart and the clock struck eleven bells. Being a work night, I decided to clean-up and get ready for bed. I was working in garage and it was a warm evening, so I decided to leave the door open and I pushed the bucket of coolant under the car so the cats wouldn't be tempted to imbibe and it would be out of reach of the kids (worried about them kicking it over), as coolant can be re-used.
Auto repair isn't my forte (if you've been reading the blog, that's painfully obvious) but plumbing... I've done enough plumbing to not make the obvious mistakes. The process of test fitting lets you understand how sets of fittings will work together before actually welding/sweating them into place, making it easy to fix problems. In the illustration, I've circled the two fittings I needed to turn the other direction so I could reach the bolt head to tighten them. Here's what it looked like once in the car and I realized I needed to flip things around:

The air filter housing blocked access to the hose going into the water pump, so I removed the 8mm bolt and pulled it from its rubber grommets. With that out of the way, I reattached the water pump hose, radiator hose, and return hose -- the soap making it easy to position the rubber hoses. Just like the dishwasher I installed earlier, I "test fit" all of the connections before clamping them into place. This works so much better than tightening fittings "as you go" because mistakes can be fixed easily. In my test fitting, I found that I put the bolt heads on the new clamps facing the wrong direction and I needed to twist the hose heading to the water pump about 90 degrees. Once lined-up I tightened the various clamps (using an 8mm socket) to fix the replacement part into place. The picture shows use of the hose clamp tool -- it was a real frustration and time saver.

It was now I reached for my used coolant and spied a frog, dead and floating about. I'm pretty sure my cooling system didn't contain any frogs, so this unfortunate amphibian hopped in overnight and couldn't make its way back out again. I've heard that coolant was supposed to taste good, so much there's an additive to make it less attractive tasting to kids, I wonder other animals can't taste the additive or maybe my garage attracts less fortunate frogs.
Makes you wonder about the prevalence and abundance of life -- it's simply everywhere. I wonder what bigger livestock has made its way into my garage when the door is left open? Given the sheer number of deer, raccoons, groundhogs, turkey, squirrels, mice, owls, small children, pheasant, snakes, dogs, and cats spotted in an average week wondering about the yard, I'm betting an open garage attracts more wildlife than I want to know.
I was disappointed in myself because I saw this dodgy pipe while fixing the water pump and thought to myself: "If it's not broke, don't fix it" and just because it looked dodgy didn't mean it actually was dodgy. I'm guessing that once the system was running at proper pressure, a weakness in the pipe developed into a leak. Mechanical systems seem to wear as an entire system, so replacing a part exacerbates the wear in others. After replacing this pipe, the next-weakest part of the pressurized cooling system are the hoses, then radiator and then the engine block itself.
Locating the part itself was a bit of a hassle. It was only available directly from Ford -- but when you order from Ford you effectively get overnight delivery to a Ford dealer and it so happens there's one just on my way to work.
Out with the Old
Fixing things was straight forward. I drove the car up onto ramps, no need to lift using a jack and place jack stands. Drained the radiator into a bucket from the petcock and found my second Imperial fitting on the car a 1/2inch plastic nut serving as the valve for the petcock, gave it a turn and I didn't get that much coolant. I could still feel the liquid in the other side of the tube so I'll be ready to catch the coolant when I remove the rubber hose. Curiously, I replaced my dishwasher the week before, all of the fittings, hoses, nuts, bolts were Imperial as well. Maybe the Crown has a lock on plumbing fixtures as well as socket ends?To do this job, I got a new toy^Wtool. It's a tool specifically designed to open the clamps on radiator hoses. It was about $18 on Amazon and a bargain at twice the price. I figured I would need to remove and replace at least six clamps, and some were not easily reachable. Having the wired extension made removing the clamps easy in that it was able to open them enough to have the stop tab keep them open. After opening the clamps, removing the hoses was remarkably hassle free. Without this tool, it would have been much more of a struggle.
With all of the clamps opened, I removed the lower hoses, careful to catch the coolant still retained in the system. About another gallon of coolant exited from the bottom of the radiator. Even with my fancy tool, I had trouble reaching the clamp on the lower hose, so I unhooked the oxygen sensor and pulled the pipe still attached to the coolant return hose upward, looking as though I disemboweled my Freestyle. The last hose clip could now be reached with ease.
Failed Clamp
Once out of the car, it was also clear that the section of the pipe closest to the water pump took the brunt rust damage. When tried to remove the fitting around the hose with my tool, I noticed that is was nearly rusted in half and had adhered to to the rubber. While I didn't
test, I would be surprised if this didn't hold the rubber to the pipe with enough pressure, resulting in yet another leak. With very little effort I was able to pull the two parts of the clamp away. The nice straight seam in the metal was a bit odd in that I didn't see anything the fitting was resting upon to cause this indentation.
The pipe's integrity was greater than anticipated, as I expected the pipe to simply collapse into pieces, or fracture where they meet the rubber hoses. Instead, I needed to scrape a little to find the problems: in two places the rust gave away to expose holes in the pipe. For comparison, I've included a side-by-side picture of the old part and its replacement.I'm going to guess enough metal remained to hold liquid at STP but not at running conditions. With the system no longer leaking at the water pump, the system was under much more pressure than before, thus forcing the liquid out while the car was running. The leaking had also corroded one of the hose clamps, reducing it's ability to hold under pressure as well.
I got everything taken apart and the clock struck eleven bells. Being a work night, I decided to clean-up and get ready for bed. I was working in garage and it was a warm evening, so I decided to leave the door open and I pushed the bucket of coolant under the car so the cats wouldn't be tempted to imbibe and it would be out of reach of the kids (worried about them kicking it over), as coolant can be re-used.
In with the New
The next day, a little bit of dish soap on the ends and I "test fit" everything back together again, putting a little soap on the ends to make adjustments easier:Auto repair isn't my forte (if you've been reading the blog, that's painfully obvious) but plumbing... I've done enough plumbing to not make the obvious mistakes. The process of test fitting lets you understand how sets of fittings will work together before actually welding/sweating them into place, making it easy to fix problems. In the illustration, I've circled the two fittings I needed to turn the other direction so I could reach the bolt head to tighten them. Here's what it looked like once in the car and I realized I needed to flip things around:

The air filter housing blocked access to the hose going into the water pump, so I removed the 8mm bolt and pulled it from its rubber grommets. With that out of the way, I reattached the water pump hose, radiator hose, and return hose -- the soap making it easy to position the rubber hoses. Just like the dishwasher I installed earlier, I "test fit" all of the connections before clamping them into place. This works so much better than tightening fittings "as you go" because mistakes can be fixed easily. In my test fitting, I found that I put the bolt heads on the new clamps facing the wrong direction and I needed to twist the hose heading to the water pump about 90 degrees. Once lined-up I tightened the various clamps (using an 8mm socket) to fix the replacement part into place. The picture shows use of the hose clamp tool -- it was a real frustration and time saver.
Finishing-up!

It was now I reached for my used coolant and spied a frog, dead and floating about. I'm pretty sure my cooling system didn't contain any frogs, so this unfortunate amphibian hopped in overnight and couldn't make its way back out again. I've heard that coolant was supposed to taste good, so much there's an additive to make it less attractive tasting to kids, I wonder other animals can't taste the additive or maybe my garage attracts less fortunate frogs.
Makes you wonder about the prevalence and abundance of life -- it's simply everywhere. I wonder what bigger livestock has made its way into my garage when the door is left open? Given the sheer number of deer, raccoons, groundhogs, turkey, squirrels, mice, owls, small children, pheasant, snakes, dogs, and cats spotted in an average week wondering about the yard, I'm betting an open garage attracts more wildlife than I want to know.
Tuesday, August 30, 2016
A Funny Thing Happened on the Way to State Inspection
My Freestyle's due for PA inspection. In my county, I'm required to get both a "safety" inspection and an emissions inspection. The Freestyle was in need of new front tires due to very poor alignment and problems with the outer tie rods, so I had that done at the same time. I take my cars to a local, trusted mechanic -- his guys do a great job when I need repairs when I don't have the time, tools or ability to get them done myself.
My car was finished -- but the dead battery resulted in the engine not being ready for emissions inspection. Apparently, the way dead battery resulted in the emissions information being cleared from the computer and I hadn't driven it enough for the engine to accumulate enough data for the emissions testing equipment. This problem was easy to solve, I just needed to drive the car a bit.
Sniff again. I've oft heard smell triggers memories better than any other sense. Thanksgiving's
melody of sage, rosemary and pepper, the cheap perfume cacophony of your grandmother's friends at her funeral, the scent of your wife's hair on your wedding day: just one whiff transports you there, like it was yesterday, like it was the present. The scent of a car's electrical system self-immolation puts be back in 1998 when, with a toddler and a two-week old, a flashing check-engine light and a small puff of smoke preceded the one-alarm destruction of our trusty Mazda Protege. This smell was similar, but new, and not the odor of impending flames. Maybe.
Once in the garage, I popped the hood and noticed first, the power steering fluid was leaking from the cap. Then a close look at the accessory belt made it clear the source of the problems: it was broken. The belt drives the alternator (resulting in the battery light) and the power steering pump.
Without the power steering pump running, the fluid overflows the reservoir and leaks over the top of the engine (according to the experts at myfordfreestyle), producing the burning smell and smoke.
Removing the belt was easy enough, just grab it and pull. But... before doing that, I made a diagram of the belt's route around the various pulleys. Since the belt was broken, I needed to guess a little, but with most of the belt in the right position, not much was left to the imagination.
The access to the front of the engine would be excellent if it not for an air conditioning line running over the top of the engine, so I don't think I could install the new belt from the top, I would need access from the bottom of the engine. The next best way to get enough access to the pulleys would be through the wheel well on the passenger's side. So up went the car and off came the tire.
After a little futzing, I had an answer: slowly back out the screw, pry under the screw head to pull it away from the fastener base, then pull the fastener out by the base. Some of the road grime made this a little difficult, but I managed to remove them all in this manner, saving me a few bucks at the auto store for a new set of fasteners. Not sure if this is the "official" method of removal, but it worked.
Inner fender out and with access to all of the pulleys, I tested each to see if they spun freely, with the exception of the crankshaft pulley. Alternator was OK as well as the power steering pump. The AC however didn't want to budge and this was cause for concern. If the AC unit's pulley froze, that would have broken the belt. Depending on the AC unit, even if the compressor clutch is disengaged, the pulley takes more force to turn than expected. I just hoped this wasn't the problem and went ahead with the belt installation, which lead to the next problem.
To install the belt, it looked like the plastic guard over the AC pulley needed to be removed. The bolts wore 8mm heads, easily reachable with an extension. Started turning, and turning when it became clear the bolts were stripped. The bolts ran through plastic and the prior mechanic just kept tightening until the threads disappeared. That means, I should have been able to apply some pressure to the back of the bolt and it would slip out, but for me, no luck. Strange. I tried wedging a screwdriver between the two plastic pieces secured by the bolt, no luck there either, this was sort of weird, I wonder what's holding that bolt in place? When I reached for a cutting tool I knew it was time for a break. So I went biking with my kid on the Butler-Freeport Trail. Did all 42 miles!
Getting the belt around the the camshaft and tensioner proved to be somewhat difficult. The tensioner is a pulley on a spring, that applies force to keep the serpentine belt taut. When changing belts, you need to push against the tensioner's spring that effectively reducing the length the belt needs to travel, giving slack for installation or removal. I have a tool designed for this purpose, a 1/4in square drive end on a thin piece of metal. I drafted my youngest kid to apply force so I could loop the belt over the tensioner and camshaft, but the new belt was tight enough that I needed to use the back my pry bar to slip the belt over the crankshaft pulley. Done!
Fired-up the car, and listened for the squeal of a stuck belt. Turned-on the AC, heard the clutch engage and the extra load on the engine, no tell-tale stuck-belt squealing. Just to make sure, I stopped the engine and put a little whiteout mark on the AC pulley so I could see if it turned. Engine running again and white dot gone, I convinced myself the old belt just wore-out at an opportune time.
Put the inner fender back into place, with some satisfaction that I was able to re-use the fasteners and back on with the tire. Took the car out for a few rides, let's hope it has enough miles for the emissions test to be run.
My car was finished -- but the dead battery resulted in the engine not being ready for emissions inspection. Apparently, the way dead battery resulted in the emissions information being cleared from the computer and I hadn't driven it enough for the engine to accumulate enough data for the emissions testing equipment. This problem was easy to solve, I just needed to drive the car a bit.
That Burning Smell
And that's where my troubles began. As I rolled up to a red light, I could smell something burning and that's when, in the still morning air, I could see the smoke pluming from the right side of my hood. And the smell, it wasn't oil, it wasn't electrical components burning it was... I just didn't know. So I parked it and headed off to work. That night, when I started it, the battery light was on and no power steering. A little more riding around and the smell and smoking returned.Sniff again. I've oft heard smell triggers memories better than any other sense. Thanksgiving's
![]() |
| Not the problem |
Overflowing Power Steering
![]() |
| Leaking power steering reservoir |
Without the power steering pump running, the fluid overflows the reservoir and leaks over the top of the engine (according to the experts at myfordfreestyle), producing the burning smell and smoke.
![]() |
| Broken Belt |
The access to the front of the engine would be excellent if it not for an air conditioning line running over the top of the engine, so I don't think I could install the new belt from the top, I would need access from the bottom of the engine. The next best way to get enough access to the pulleys would be through the wheel well on the passenger's side. So up went the car and off came the tire.
![]() |
| Easy as 1,2,3! |
Plastic Rivets: Defeated!
To get reasonable access to the pulleys, I would need to remove the inner fender, affixed to the car with my nemesis fastener. This time, I would not succumb to frustration and decapitate them, but I would figure out how to remove them -- there must be a way.After a little futzing, I had an answer: slowly back out the screw, pry under the screw head to pull it away from the fastener base, then pull the fastener out by the base. Some of the road grime made this a little difficult, but I managed to remove them all in this manner, saving me a few bucks at the auto store for a new set of fasteners. Not sure if this is the "official" method of removal, but it worked.
As the Pulley Turns
![]() |
| Inner fender removed |
![]() |
| Belt diagram I made earlier |
Belt Installation, No Cutting Required
Looking at the problem with fresh eyes, I saw enough room to push the belt between the pulley and cover, using a prying tool to do the job. Then it was on to the rest working counter-clockwise: power steering, alternator, crankshaft and then a slack loop held by the tensioner.Getting the belt around the the camshaft and tensioner proved to be somewhat difficult. The tensioner is a pulley on a spring, that applies force to keep the serpentine belt taut. When changing belts, you need to push against the tensioner's spring that effectively reducing the length the belt needs to travel, giving slack for installation or removal. I have a tool designed for this purpose, a 1/4in square drive end on a thin piece of metal. I drafted my youngest kid to apply force so I could loop the belt over the tensioner and camshaft, but the new belt was tight enough that I needed to use the back my pry bar to slip the belt over the crankshaft pulley. Done!
![]() |
| Mark on AC pulley |
Put the inner fender back into place, with some satisfaction that I was able to re-use the fasteners and back on with the tire. Took the car out for a few rides, let's hope it has enough miles for the emissions test to be run.
Subscribe to:
Posts (Atom)