Showing posts with label cvt. Show all posts

Saturday, December 24, 2016

Christmas tree and a trip to the mall

We went to our local tree farm (being out in the country, there are several tree farms to pick from) to slay our Christmas tree.  The "product" of a fresh-cut tree involves climbing on a tractor, being abandoned in a field with a saw and hauling the tree home atop one's car after the tree has been baled. Wondering around in the field looking for a tree means that quite quickly, nearly all trees begin to look the same.  Only once it's home does one notice the bald spots and general crookedness of a tree that looked just fine in the field.  Buying a used car is pretty much the same experience, what looks to be great in the lot with its companions seems to loose its luster once you've gotten it home. Buyer's remorse?  Maybe it's just too difficult to process so much information at one go, so our brain fills in the details, dents and scrapes.  When we're looking at one car, we can the concentrate on the finer details.


Probably won't fall off, maybe?
 We didn't always go Christmas tree hunting, in our family, BC (Before Children, or, BCE, Before Children Existed for the folks with a knot in their kickers and variously colored hair.), we celebrated Christmas sans a tree. Having a $500 dollar car means not having to worry about dents/scratches incidental to getting the tree home, all one needs to do is heave the tree on the roof and secure it with some twine.  No padding or a tarp, just get close and lob.  It wasn't always like this, when we drove an overpriced Honda SUV or pricey minivan, we cared about the roof.  Dents?  Scratches?  Sap? Mud? All of that used to matter when our car monthly payment approximated the purchase price of the Freestyle.

One feature of the Freestule that I just love is the raised roof rack.  This made securing the tree much easier, as I had an easy place on which to loop the twine and make knots.   In the process poorly securing the tree to the car, I looked down and what did I see by an expended hypodermic needle.  It's probably flotsam from a friendly neighborhood injectable drug user, either getting their tree or working in the fields.  Maybe a diabetic?  Most diabetics fanatically keep their sharps safe, so maybe, but unlikely.

A trip to the mall, some more Christmas lights

Limp home mode
The next day, we got the first snow of the year: better than a light dusting, maybe one or two inches. On my way to the mall, after dropping my kid off at work who didn't want to drive in the snow I felt the AWD system kick-in and then my troubles started.  The car went into "limp-home mode".  An Eat 'n Park was close by, so we stopped there for brunch and after eating we'd see if the problem went away, as stopping for a quick road-side reboot of the engine didn't help.  I didn't have my code reader handy, I'm not sure what problem occurred, but we got the combination wrench and check engine lights, as the picture shows.  This can mean either transmission, transfer case or throttle problems.

Former furniture store
Post breakfast, the engine started without an issue.  We needed to head to the mall for some shopping, which was close. If the car became cranky again, the plan was  to have the better half shop while I called for a tow.  I'd have a nice place to wait at the mall for a tow truck and would return to the mall with a working car.
My last visit to the mall was... I can't even recall when I was last at the mall, but over the years, there's been a shift from retail to personal services.  Now, however, the transition now seems to be from personal services to just empty spaces, not unlike the transition many small town's main streets in the area endured in the 1970's as retail fled main street for the mall, store fronts turned into exercise and tattoo parlors before the front windows served to hold news paper concealing the empty insides.

Earlier this year, before the retail season, Sears closed at the mall.  When the Beaver Valley Mall opened in 1970, Sears was an anchor tenant (along with Gimbels and Horne's), maintaining the same location for 40+ years: a dependable source of tools, lawnmowers,
As always, an empty lot around Sears
boots, Levi's and something polyester your grandmother would wear to a cousin's wedding.  The next biggest tenant, Macy's, doesn't look to be sticking around, as the upper floor has been closed and the range of merchandise greatly decreased.  Meanwhile, across the street, Wal-Mart's lot brimmed with shoppers.

Wednesday, August 10, 2016

Transmission Fluid Change, part 3

I paid $15,000 for our first house; purchased it from a family member who sold it to me as a way of evicting the current residents, who were, from my estimation, auditioning for "Hoarders: Buried Alive!"  The house needed some work, with a good roof and and a functioning kitchen, I figured "why not?".  To make the house habitable, I needed to empty it of several years of garbage (Who needs a garbage can? The floor's right there!), which required a dumpster. Before I could get a dumpster, I needed to clear the yard so the dumpster would fit, which meant I needed to clear the driveway so I dumpster could fit there to hold the flotsam from the yard.  Getting the picture?  No one "simple" task could be started, because several other things had to be done first.

My $500 car experience echoes my 15K house experience.  Small tasks mushroom into multi-day projects as stuff just falls apart or has been mis-handled so that proceeding requires fixing a few additional things along the way.  This makes any job unpredictable in terms of expense or time, as my CVT fluid change has shown.

This is the last installment of changing the CVT fluid, after a number of problems, I was able to get this done as well as replace the high-pressure filter. The biggest fly in the ointment: a broken transmission cooling tube.  As the photos clearly illustrate, the thick coat oil and road grime evidences a leak, somewhere, just not sure where, yet.  When replacing the water pump, I found what looked to be a leaking camshaft seal, having replaced that, let's hope the remaining oil leaks can be handled through a quart between oil changes.

I'll Be Your New Transmission Cooling Line


New hose
Nice and clean, delivered in just a few days from Tasca parts.  I wasn't expecting to get so much additional hardware, as the line included a the mounting bracket holding the hoses to the transmission.  The ends, covered by little red gnome hats have the additional o-rings, so I don't need to use the ones included in my oil change kit.

Removing the old line


Line looks to be leaking
Since this was removed from the high pressure housing, most of the work of getting access and disconnecting the old lines was completed already.  To access the refill plug and disconnect the old lines as part of a "normal" transmission service, the air intake and air filter box were already out of the way.  There's a few electrical lines attached to the harness, so off they came, then two remaining 8mm bolts. Once those were off, I removed the lines from the cooler with my handy adjustable pliers — making sure I had a catch basin for the fluid still trapped in the radiator and the old line.  No stripped or broke bolts.  Not so bad!

Note the circled part, from where the metal line meets the metal hose, there's a large amount of oil and dirt accumulation.  Maybe this is the source of the leaking in this part of the engine?  I hope so.

Install New Line

Where the trouble began...
I started the process at the high pressure housing, because I didn't want any damage to the mating surfaces.  The bracket went back on the transmission, this was easy as there was really only one way for it to be positioned.  Then the second fastener of the loop in the line and connecting the lines to the radiator.  I used some adjustable pliers to release the tension on the clips and the dripping fluid from the radiator served as lube.  Again... Not so bad.  I must be getting better at this or I'm experiencing a great stroke of luck.

Refilling the Transmission


Measuring old fluid
First, I measured the remaining fluid and used that to figure determine the amount for replacement. Measured 4 3/4 quarts, that's what I'll replace and check check the dip stick after going out for a drive or three and the fluid has warmed.  I've captured a picture of the old fluid in a measuring cup, it rivals the muckyness of the brake fluid.  Doing a little reading, Ford does add some red dye to this fluid, you can see from around the rim how the fluid looks a bit rouge.

New fluid looks just a bit cleaner
The new transmission fluid is a nice shade of honey, it doesn't look to be dyed any color.  I happen to have one of those extended funnels, making adding the new fluid very easy.  Not knowing how the fluid would flow into the case, I was careful to pour slowly and look where the funnel meets the case to watch for overflow.  The transmission slurped-up all of the fluid as fast as I poured.

Square Drive, Imperial Measurement and ISO 1174

The transmission filler plug has a square 3/8 head.  This is the same size as the drive head on a socket and, for a car with metric fasteners, decidedly out of place.  Why not metric? This transmission, a ZF design, hails right from the heartland of metricness, so why pick something imperial-sized?  This caused me to realize that no matter what the fastener type, the interface to the tool applying the force is complements of the Crown.  Torx, Metric, English, TP3, ZXN?  No matter what, these fasteners attach to to an 1/4, 3/8 or 1/2 inch square drive head on your ratchet.  Why not 5mm, 10mm and 15mm interfaces to the sockets?  The world has moved on to metric, except, it seems, for square socket drives.  Or has it?

Somebody should know about drive socket sizing.  I contacted the Hand Tools Institute asking the the question, why are the drive sizes still imperial.  The answer, yes people actually reply to my emails, was that they're metric, just "soft conversions" from imperial measurements and that all this can be found in ISO 1174-1 for hand-driven sockets or ISO 1174-2 for power driven sockets.  What we really have are 6.35, 9.53 and 12.7 square drive sockets conveniently labeled as 1/4, 3/8 and 1/2 inch.  That means the 3/8in square drive for the transmission refill plug is really a 9.53mm sized square drive, labeled as 3/8in for convenience.

I was curious about the term "soft conversion" and doing a little more reading revealed that there's actually three types of conversion methods: hard, soft and adaptive.  A hard conversion means changing the measurement when converting, for example a 1/4 inch fitting would be specified as a 10mm fitting.  Adaptive means the measurements are approximations of each other, in this case a 1/4 inch fitting would be converted to a 9.5mm fitting.  So, while "soft" conversion is least precise sounding, that's the opposite in practice.

All Done

After rust removal and a bit of paint
All that was left was putting the transmission mount back on the car and replacing the inner fender. Recall the poor shape of the transmission mount.  I removed the worst of the surface rust and with a little paint, it's in much better condition.  The surface rust on the part didn't affect the performance or integrity, I'm hoping the little bit of extra effort keeps this part from becoming a problem for the remainder of the car's life.
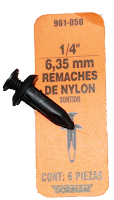
In the process of removing the inner fender, I broke the many of the plastic rivets holding it in place.  I stopped down at my local auto parts store and found a pack of replacements for a few bucks.  With these, I was able to re-secure the plastic inner fender and I was done.  If I think I'll be doing more work on the car, I'll probably figure out how to order a bunch of these from Amazon, as I think I ended-up paying about $.25 for each and from the looks of the part, the markup was 10x.  There's no reason why I couldn't get a bag of 50 on-line for just a few bucks more than I paid for six at a my local store.

Monday, August 1, 2016

Transmission Fluid Change, Part 2

I got the idea I should replace the CVT fluid.  In the process of removing the housing for the high pressure filter, I encountered a stripped T-40 torx fastener.  Being determined to change the filter, removing the screw required a bit more effort than expected, here's what I did:
  1. Grab outside, attempt to spin (failed...)
    The tight position of the bolt didn't give me enough room to grab it by the top and spin.  If there wasn't so much other stuff in the way, this might have worked. 
  2. Screw extractor (failed...)
    I happen to have a set of screw extractors.  They work by drilling a pilot hole and using another bit with reverse threading.  When run in reverse to remove the screw, the bit digs into the metal, providing enough friction to wind the fastener out.  The hardness of the metal used for this screw made it impossible for the reverse head to grab into the metal.  I tried several different sizes, all with the same result. 
  3. Decapitate, wind out remaining stem of screw (worked!  jk, this failed too)
    This is accomplished by running a drill bit through the center of the head, making a hole larger than the stem of the screw.  When the drill reaches the stem, the head will have nothing fixing it to the stem and the remaining screw can be wound out once the part has been removed. The hardness of the faster made this slow going, to the point where the metal screw was being polished more than cut.
  4. Cut head to fit slotted screw driver (victory!)
    Used flat-head at 10 and 4

    Should have done this from the start.  Cut a slot on a radius line in the head of the fastener, use slotted screwdriver to remove.  I didn't have an easy way to reach the bolt in question, but I did have a Dremel, I just needed the right cutting tool. The part wasn't accessible with a cut-off ring, but I could reach it with a plunge cut bit. Such a thing exists for Dremel tools, even rated to cut hardened metal: the 9903 Tungsten Carbide Cutter.  At high speed, the bit chewed thought the metal no problem. With enough material cut away to fit a large screwdriver, I was able to get a twist on the bolt and break it free.  Obviously, this method sacrificed the fastener, I'll need to get an approximate replacement at the hardware store. 

So, it was dirty...

Something was leaking, so dirty
The housing for the high-pressure filter was a mess. The leaking fluid + road grime coated the part and worked its way into the mating service around the seal.  Without a parts washer, I used some paper towels and de-greaser to clean away the residuum.  The toughest barnacles on the mating service were then scraped away with a razor.  I always worry when cleaning a mating surface, I want to make it clean without introducing any scratches that could affect how well the seal functions.  For this part, it looks like the o-ring does work of sealing the joint, so I'm not terribly concerned about metal, but I'm extra careful just to make sure I don't make things worse than when I started.   

Broken Transmission Cooling Lines

Arrow points to cooling line part
When I tried to remove the lines from the cover of the filter casing, they wouldn't budge.  I had trouble reaching them from the top of engine to pull upwards, so I struggled from the bottom and when the first line came out the second, after a light tug, snapped.  Or maybe not.  Considering the amount of oil around the part, something was leaking and it wouldn't surprise me if this was in some nearly broken state at the start.  At least my theory assuaged me as I went about searching for a new transmission cooling line.

Finding the Part, found a new vendor

Amazon and RockAuto didn't stock this part, so I looked at the official Ford parts site ($107, next day availability) to get the part number and they searched to see if I could save a buck or two.  I found the part at Tasca Auto parts for about $75 + $8 shipping.  I saved a few dollars because I could afford to wait a few days.  At Tasca I was completely surprised by the service: I sent some email to double-check if I was ordering the right part and somebody got back quickly asking for the VIN for verification and then replied with the correct part number I needed to order.  I would have ordered the wrong part without checking with the vendor, so I'm glad I did. I'm guessing the customer service department at Tasca saves a huge amount in re-stocking costs by making it easy to verify fitment by VIN.

Extraction...

Getting the remainder of the cooling line from the housing was a bit of a challenge, maybe I did tear the line during the first removal attempt.  Since the tubing was a soft metal, I was able to get a hook to dig-in so I could remove what remained.  This could have been much worse if the parts had fused together.  Without a way of measuring the force, I can say with certainty how stuck this was, but I had my doubts I could extract it from the housing in which it was trapped.

Looking at the part, the break occurred in the groove accommodating the o-ring.  This part of the pipe is thinner and thus weaker, and the odd insertion angle made removing this tube difficult.   When we get the new part, I'll have to be extra careful when inserting it into the filter housing cover.

 The Filter

Part of the old filter was
stuck in housing
Note larger opening on filter, at first
I thought I had the wrong filter.
Removing the filter was done with a hook pick and a light tug. Once removed, I checked if the old filter was like the new filter, to make sure I had the right replacement. There was a difference in the opening where the filter interfaced with the transmission.  As I was muttering various vulgarities, I looked in the filter housing and saw the opening was bigger as well.  Did I get the wrong filter? That's when it became apparent the new filter was slightly taller than the old and didn't have an o-ring at the top. Ahhh...  I realized the top of the old filter separated from remainder and was still in the transmission.  I reached inside and with a pick removed the cap from the prior filter and new one fit perfectly.

Just so dirty...
After use, on expects filters to look dirty because... they catch dirt. But the old filter looked particularly bad. This is were I started to worry a little because this tells me the transmission wasn't completely serviced in a while.  Maybe the fluid was drained and replaced, but the filter looked particularly worn. Two other things to note: the outer cloth around the filter and that it was constructed of metal instead of plastic like it's replacement.  Not sure if any of these differences affects filtering performance.  For what it's worth, the replacement part is an official Ford replacement "kit", costing $32, comprised of filter and o-rings for the filter hosing and cooling tubes.

Not really sure why the old
part has oxidizing
While we're looking at old versus new, taking issue with the poor state old part, the filter kit come equipped with a little tube with some rubberized coating.   This tube transports fluid from the transmission to the housing, so it's a good idea for it to be in working order.  Note the material around the outside of the part, on the inside (not pictured) I didn't see any corrosion and the part felt sturdy.  This tube sits between the filter housing and transmission case and should be well protected by both, I'm wondering if the filter housing wasn't well seated thus contributing to the oily deposits in the area.

Installing the Filter

I put some clean transmission fluid around the filter's o-ring and it popped right into place.   I then put some new fluid on that rubber coated pipe thing and the o-ring on the cover and tried to seat the part. That didn't work, it just wobbled and I was worried I would damage the small tube part, so I replaced the T-40 screws one 10mm bolt and tightened them round-robin until they were nice and snug.  I also did my best to clear away the gunk where the filter caps meets the transmission; I didn't want to get any contaminates into the transmission, so I did my best with a shop rag and very little de-greaser.

Next post, I'll cover replacing the broken line and putting things back together.  

Tuesday, July 26, 2016

Transmission Fluid Change, Part 1

My Freestyle's engine puts its power to the wheels via a CVT transmission.  CVT stands for "Continuously Variable Transmission" so the oft-said phrase " CVT transmission" is a bit like saying "RAM memory", or "you only YOLO once".

Thanks Mitsubishi motors
A CVT works by connecting two conical pulleys mounted on shafts, one being the power from the engine and there other being the output to the wheels, with a belt. The pulleys then change where the belt rides on the pulley to change the rotation speed of the input shaft compared to the output shaft. Or something like that.  Wikipedia contains an excellent description and history of this technology.