 |
| Torque mount is broken |
What's the purpose of this part? The engine in a car will "twist" in the direction of the crank shaft's spin. Since this engine's crank spins in clockwise motion, the engine will twist in the direction of the front bumper. The engine mounts resist this force, and, in the case of this car, there's two mounts (one above the engine, one below) designed to further resist the torque so the engine stays under the hood and delivers power to the wheels to move the vehicle.
Two approaches
While not necessary for the safe operation of the car, evaluating the options for repair made sense. After a little research, two possible solutions made themselves apparent:- Purchase a new torque arm with bushing
This costs about $120. The torque arm would contain a new bushing, the work would involve swapping out the old arm for the new. - Purchase just the bushing
This costs about $15. I would have to remove the old bushing and replace it with the new one. I could leave the torque arm attached to the engine and try to press in the part in situ thus saving some work.
Removing the old bushing
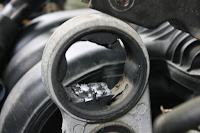 Can't replace what you don't remove. So first order of business: extracting the old bushing from the torque arm. I started by removing the 13mm bolt running through the torque arm connecting it to the body of the car. Then it was easy to see the poor condition of the bushing. What you can't see clearly in the first picture is that the part of the
bushing holding the bolt was completely separated from the rest of the
part.
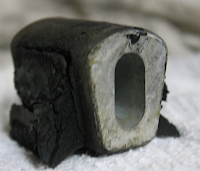
After I removed the bolt holding things in place, the middle of the bushing just fell out onto the top of the engine, I grabbed this part and took a picture of it on the bench.
Cutting out rest
 Using a hacksaw, I flipped the blade upward and threaded it through the now evacuated bushing. I carefully cut in two places, making sure not to cut the mounting itself. Using a flathead screwdriver, I pushed down between the cuts and the old part collapsed and fell out. Not wanting to damage the arm itself, I didn't cut all the way through the metal of the bushing, so that's why I needed a little extra help from the screwdriver to relive the pressure.
 Installing New bushing
The plan was to leave the torque arm in place and using some grease and pressure, press the new busing into place. This did not go well... it was a learning experience! I'll ruin the suspense: I did, eventually, finish this project, but not in the way I expected at the start.Attempt 1: Oil Filter Socket plus Wood with Bolt and Nut
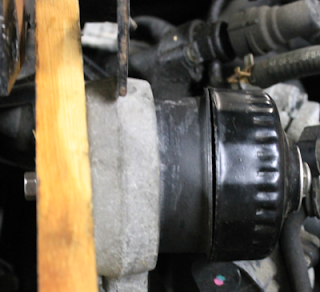 Expectation: Using a oil filter socket to hold a bolt and send the force to the edges of the fitting, I would "wind" the bolt to draw the part into place. The leverage from the bolt and nut would produce enough force to accomplish the job
 Reality: The bolt wasn't sturdy enough and bent under force when wound, the threads failed, causing difficulty removing the nut when this didn't work. Not visible in the picture was the deformation of the washers. It was also very difficult to keep the oil filter socket in place when under low compression. After about an hour, zero progress. Interestingly enough, there was no damage to the oil filter socket. It was necessary during my Toyota-owning days and even though the car's gone, the few tools I needed just for it remain in the garage.
Lessons learned: Not sure what to expect for a first attempt, but I think I didn't get enough clamping force from the bolt/nut despite having a good way to distributing the force the edges of the bushing. Will need to improve method of delivering force, bolt/nut good idea in theory, implementation left much to be desired. Just like the Toyota, the oil filter socket was tougher than it looked.
Attempt 2: Hot & Cold with Metal Braces and C Clamp
Expectation: I would warm the arm (thus making it slightly larger) and cool thebushing (therefore, making it slightly smaller). Once in their expanded and shrunken states, I would then be able to force the bushing into place with less force.
 To apply force, I used a c clamp that could exert 11,000lbs of force (that's what the tag said) and I used a metal shelf upright so I could apply force across the outer edges of the part, making the best use of the squeeze created by the c clamp. Why a metal shelf upright? Because that's what I had.
Making the bushing cold was no problem, I put it in the freezer overnight. Heating the torque arm was another story. I don't have an acetylene torch, but I do have plumbing tools and a few canisters of MAPP gas (which burns a little hotter than propane, but not much), but I was worried about stressing the metal, so I used my wife's heat gun. Not getting the part warm enough, I covered it with some insulating material (yes, a bath towel) and let things run for twenty or so minutes.
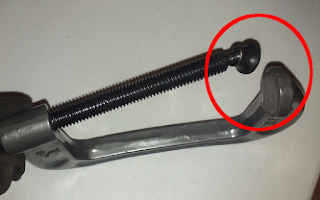
 Reality: After some effort, we did get a little of the bushing into place. However, the c clamp couldn't deliver enough squeezing force to do the job. I used some lubricant on the threads of the clamp so it word turn easier, but that didn't make much of a difference. As I was turning the clamp, it wasn't moving the bushing much, but the threads were advancing. That's when I noticed I was actually twisting the clamp itself.
Lessons Learned: The heating and cooling really didn't make much of a difference. The c clamp I think did the work here, just not enough force to push the bushing through. Under the pressure, the c clamp also failed, twisting enough so that it doesn't function well as a c clamp any more. Also: maybe the lubricant helped?
Attempt 3: Better Metal Braces with Improved C Clamp plus Bolt and Nut
Expectation: A better clamp and clamp supports would distribute an increasedclamping force better, resulting in the part being seated in the torque arm.
 |
| Before... |
 |
| ... after |

I used an socket extension to get more leverage to turn the c clamp, this worked well until I bent the tool's handle. The handle bending should have alerted me that I was exceeding the clamping power of the tool, but I just kept going anyway, as I was determined to make this successful.
 |
| Another bent c clamp |
Attempt 4: 12 Ton Shop Press
Expectation: a 12 ton press would create enough force to push the bushing into the torque arm. I would need to remove the torque arm because the press is something that could not be positioned over the engine. This would be much easier because, I would be doing the job the right way. Doing things "the right way" is easier, at least most of the time, in certain circumstances, under most conditions, forgoing extenuating situations. |
| Hard to reach bolt... |
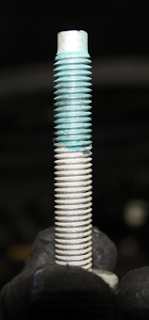 |
| with Locktite |
 |
| Before pressing |
 |
| Parts removed from engine for access |
 |
| Ready for install |
Lessons Learned: I thought this was going to be an "easy" project. The parts were cheap ($15) and what I needed to replace was sitting right there in front of me, no digging through the engine necessary. Not so. Just because it looks "easy" doesn't mean it will be actually easy.
The Result
The engine feels better when pressing the gas, not necessary faster, it has a more solid feeling when accelerating. When I got the car, it felt like the acceleration was sluggish -- but when I did this job, I also cleaned the throttle body (more on that later...) so attribution of this change to just the mounting wouldn't be good logic. Maybe I've prevented the engine mounts from failing prematurely, but that's just a guess.Had I known it was going to be this difficult, I would have just ignored the engine mount and put my efforts elsewhere. The cost wasn't that much, it was the time (this took over a week to completely fix) involved to make the repair I found to be frustrating, as there's other things in need of attention.
No comments:
Post a Comment