Tuesday, May 31, 2016

Tale of two water pumps

My Freestyle needs a water pump. I expected this to be a "mystery leak" and expected to be driving about with a store of water in the trunk and ready apologies as I left a trail of drainage wherever I parked.  The leak was obviously coming from the water pump, which was easily reachable and I could replace quickly once I purchased the part.

How much could a water pump cost?

Turns out, it depends on how quickly I needed the parts.  From my local parts store, we're looking at $250 (half the car's purchase price!), it's not in stock at my local store, but it's in the greater Pittsburgh area, so close enough for "same day" availability; however, at Amazon, I can get roughly the same part for $120, delivered in a week.  The monetary differential is nearly 100% ($130, or about one quarter the car's purchase price), but goes to show one of the problems of this exercise: it’s easy to be economical when you already have money and resources:
  • I have another car to drive
  • I can have a car disassembled in my garage for an indefinite time period
  • I have a garage where I can work in comfort
Let’s say I stick with this “live with a $500 car” and not use anything else, due to my employment, I could easily work from home and nobody at the office would bat an eye if I ran late or was absent due to car, or any other for that matter, problems.  Few people have this option who find themselves in the $500 car market -- they're in jobs where the boss is much less flexible and/or compassionate.  Missing work can mean being out of work, so saving money on a car is a luxury and others find themselves trapped, not being able to save money because they don't have enough to be thrifty in the first place.  Being poor is very expensive in the US.

Poverty Trap

The poverty-trap was chronicled with the (now classic) book Nickled and Dimed... by Barbara Ehrenreich, who with modest start-up funds, attempted to get by on a series of low-wage jobs in various cities.  Obvious differences exist
between what the author experienced and “real life”, the key one being that the current situation of the author was entirely voluntary and, most importantly, escapable.  It’s vastly easier to live a life the economic margins when you know you can walk away versus knowing, short of a winning lottery ticket, your circumstances won’t change.


When this book was written around 2000, the author was working at minimum wage jobs paying (then) about $5 per hour.  Today, 16 years later, the legal starting wage “low skilled” jobs is about $7/hour, despite what nobody could deny as generally increasing prices. 

Fed Min wage versus CPI
Or not? I moseyed over to the BLS site and got the CPI one year after we partied like 1999 and compared it's growth in relation to the federal minimum wage over the same period.  CPI was up 37%, and the minimum increased by 40%.  Wait... that means a worker at minimum wage would be slightly better-off now than in Y2K.  What's up with that?  I agree things feel more expensive, more than 37% more expensive... so why doesn't this jive with the data?  I even made a graph showing the percentage change and the cumulative percentage change between 2000 and 2015, the last year data was available. Numbers don't lie, but they also don't necessarily tell the truth.  A question for another day.  (N.B. I'm not at all happy with the hedonistic adjustments in the CPI, but that's an even more tangent discussion...)
 
In this trek with my $500 car, I also have the luxury and peace of mind of knowing that, if the wheels fall off the bus (this might not be figurative), there’s a large safety net to fall back upon.  Some of the safety net comes from hard work, but good fortune as plays a large, if not larger part of my current circumstances.

But am I saving money?   Not sure yet.  Through the character Sam Vimes, prolific author Terry Pratchett said it best:

The reason that the rich were so rich, Vimes reasoned, was because they managed to spend less money.

Take boots, for example. He earned thirty-eight dollars a month plus allowances. A really good pair of leather boots cost fifty dollars. But an affordable pair of boots, which were sort of OK for a season or two and then leaked like hell when the cardboard gave out, cost about ten dollars. Those were the kind of boots Vimes always bought, and wore until the soles were so thin that he could tell where he was in Ankh-Morpork on a foggy night by the feel of the cobbles.

But the thing was that good boots lasted for years and years. A man who could afford fifty dollars had a pair of boots that'd still be keeping his feet dry in ten years' time, while the poor man who could only afford cheap boots would have spent a hundred dollars on boots in the same time and would still have wet feet.
I this case, I wonder if my $500 car will be more like Sam's boots, needing constant repairs so that any economy from the low purchase price will be overwhelmed by maintenance costs.  We'll see, time will tell.

Water Pump Replacement

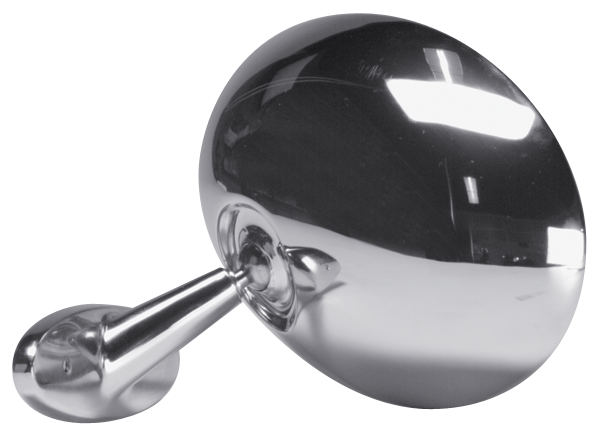
What was this about? A water pump, right? After some searching Amazon and not being that happy with the prices, I settled
New pump
on getting my replacement part from a vendor on Ebay.  They were located in CA, I wasn’t in a rush so I figured I could spare a few days for shipping, which was included in the price of the pump at 89$.  Two business days later, a new water pump was on my front door step.  Amazing!  While the “free two day” shipping included with Amazon Prime sounds good, I’ve found that many other vendors ship just as fast, if not faster, than Amazon’s “two day” promise.

Back to the water pump.  What I ordered is different from pump on the motor in two ways: the impeller is metal and the pump does not attach to the cam with a bolt.  Instead, it has a key matching the notches on the cam.  The new way the pump attaches to the cam is a obvious improvement, as this method eliminates a bolt and possible path for leakage.  The metal impeller’s advantage is less clear, but the “gut” reaction is plastic trumps metal.


The proof, however, is in the pudding, in that the existing water pump failed due to a leaking seal, the impeller remained intact.  The reason behind me choosing the the pump that I did was primarily a price decision.   I think that something else will kill the car before new the water pump stops working.

Prep Work

This pump needed the “top half” from the old pump and included a new gasket.
Mating surface before clean-up
Before putting things back together, I cleaned the mating surface with just a rag and noticed some imperfections.  Not wanting to distort the surface by scraping or using sandpaper, I found the most gentle abrasive in my garage -- cutting compound.  A little water and elbow grease removed just about all of the remaining dirt and a pass with a razor blade removed a few of the larger chunks. 

Cleaner! Ready for seal.  Ribbit!
Surfaces in better shape (but not perfect!), I coated the gasket lightly (very, very lightly) with some sealant and tightened the 8mm bolts in a “star” pattern.  There’s much debate about when to use gasket sealant, for cork gaskets, the rule is “never” and for rubber gaskets the advice is generally “meh”.  I couldn’t find much advice on a metal gasket; however, the sealant material can interfere with the mating surfaces when applied in too great a quantity, but at the same time can help compensate for parts that have some pitting or wear. 

Since the "top" of the water pump looked a little worse for wear, I figured a very thin coating of sealant would be appropriate.  We'll see what happens.  If I get some leakage, I'll know what I did wrong and I'll have practice cleaning the seal mating surfaces.

Fitting the Pump 

Recall the new pump has keys that fit into the notches on the camshaft.  I tried to orient these before putting the pump against the engine, but I needed to reach inside the pump to turn the impeller a little for everything to come into alignment.  When it did, the pump was seated flush and all that was necessary was to tighten the long bolts with 8mm heads so that the part stayed put.

After that, I installed the water manifold (with new thermostat), attached the various hoses and refilled the system with coolant which I'll cover in my next post.

Sunday, May 22, 2016

Leaking camshaft seal

Thanks Relatably.com
Behind the leaking water pump lurked a leaking camshaft seal. For just a few dollars, I was able to replace this component and since everything else was apart, it made sense to do this extra bit of work.  Such is the slippery-slope of repairs: fixing something makes apparent what needs to be fixed next.  Then, because things are apart, you might as well fix...  it's difficult to stop.  In fact, I'm resisting replacing the starter; it works fine, but since it's exposed anyway, it's not that much additional work (just four bolts!) and only about $90... I'll stop.

We got into this thinking with our house: shopping for a canister set morphed into remodeling the kitchen.  Planted a few flowers and ended with a medium-scale landscaping job.  In a way, I resist starting projects because that's the easiest way for me not to fall into the "marginal effort" trap. And that's a problem in and of itself.

Right tool for the job

Sounded better than it worked
I've never replaced a seal before, this was new territory for me. I took the advice of the internet and purchased a camshaft seal puller for the job.  I couldn't get this tool to do much good because the positioning of the camshaft left me little room for leverage.  I ordered this from Amazon, because it was inexpensive (about $15) versus other vendors and nobody close had this tool in stock.  I had Prime, so the two day delivery took about a week.

For some reason, even though Amazon was the vendor, it took about 4 days of "getting ready for shipping", so while the elapsed time was 5 or so days, the shipping was still "two days".  This is the frustrating part about Amazon, I find myself going there because I think shipping will be better/faster but when I order from EBay/RockAuto, the parts arrive quickly and at a total cost that's about the same as Amazon, without the $100 annual fee.  I get value from Prime in other ways: the Jazz station on Amazon Radio is fantastic and the video on demand seems to be better than Netflix these days.  But for shipping alone, Amazon Prime isn't much of a bargain.

The wait for delivery cost me a week of time, as I needed to replace the seal before reassembling the rest of the cooling system. Since the engine wasn't running and the car was propped up on some ramps, I couldn't do much to reposition the car for other repair work like replacing the paper-thin rear brakes. 

Actual tools for the job 


Actual seal pullers, bonus Rorschach oil stain
In the end, I used a pick and small screwdriver to pull the seal out, with the pick doing most of the work.  The seal puller was both a waste of time and money for this job. Using the the pick and screwdriver, I was able to get around the seal and get a good grip for extraction.  Unlike the water pump, by examination there was no "look right there!" problem with the old part, other than the accumulation of oil on the engine block underneath the seal. 

Seal seating tool
Before replacing the seal, I put a bit of oil on the outside and inside surfaces and pushed the part into place.  This required a bit of wiggling and I used my small screwdriver to make sure the seal was correctly/evenly seated around the camshaft.  I then used a 1 1/16 socket on an extension as my seating tool gently tapping the seal into place with a hammer.  I've been finding some combination of a hammer plus another tool has been very handy thus far in this little project of mine.

 Done!

New seal, hopefully no leaks!

There's no way for me to test if this is properly done before assembly, so I'll cross my fingers and hope for the best. No doubt, more leaks exist, so it will be difficult to know if this replacement made a difference -- but I'll keep my fingers crossed!

Pick the red seal
With a little clean-up of the image, here's a comparison between the old (black) and new (red) seals.  Looking closely, the black seal has damage from the removal process but otherwise looks "OK". I don't have a before picture of the area around the seal, but it did have a considerable oil accumulation.  I'm just happy leak from the water pump didn't result in water going through the seal, as that would have much harder on the engine.

This being done, I'm ready to attach the water pump and next the coolant manifold and refill the system.  Once completed, the engine will be in running order again. 

Tuesday, May 17, 2016

Sorting out the water leak

As advertised, my Freestyle leaks coolant; in this case, water, because the prior
There's the leak
owner (PO) just filled the cooling system with water as coolant steadily leaked out.  The water leak was enough of a trickle that the car could be driven home, the PO telling me the coolant needed to be refilled every day or two. I think this was the critical reason why the car was on the market.  The oil leak seemed to be something that could tended to on a weekly basis, this problem was every few days.  From the PO's perspective, the leak was coming from the radiator.

I was looking forward to be working through a "mystery leak", this would be fun (hey, don't judge) to track down and make for more interesting content for you, the reader.  What the PO believed to be a leaking radiator wasn't that at all -- this is both good and bad news.  Debugging the problem was easier than expected, after getting the car home, there was a nice steady drip visible from under the car that we traced to the bottom of the water pump.  I spent time looking over the radiator and I didn't see any leaks.

The water pump is at the top of the engine and easily accessible.  Feeling the underside of the pump, I felt what seemed to be the source of the problem: the water pump is two halves and the seal between the halves failed, thus causing the leak. To check my inkling, I needed to remove the pump and have a good look.

Staining from coolant
Removing the water pump first required the removal of the air intake, then the  thermostat manifold which required removing about 20 water hoses.  The hoses felt like they hadn't been moved since the date of manufacture and didn't want to budge.  Not having a proper radiator hose pick, I used a small screwdriver to separate the rubber from the manifold, fearing I would split the hose.  But, I managed to loosen the hose from the fitting while keeping everything intact.

Getting a good look at the pump reveals that the leak isn't from the front gasket as originally suspected, but from the back.  The water was adhering to the pump
Crystallized coolant
housing and giving the appearance the leaking coming from the pump gasket.  The leak left a clear discoloring on the part from the leaking fluid, and there were deposits on the end of the impeller shaft, so that’s the problem. 

The root cause, a failed seal
Just to make extra-double sure, I used my 8mm socket disassemble the pump and then using a hammer and 10mm deep-well socket, removed the impeller from the housing.  Here you can clearly see the failure of the seal on the impeller shaft, so I'm sure that's the problem.  After much digging, I found that, for this car at least, you cannot purchase just an impeller, so I'll need to buy a new water pump.

At the same time, the camshaft seal was clearly leaking oil.  This resulted in the deposits on the top of the engine and maybe was the source of the oil on the lower part of the engine as well.  The oil leak doesn't look that bad, but it will worsen over time, so best to replace the seal at the same time as the water pump.

Saturday, May 14, 2016

Side mirror

Mirror, broken, missing decorative cover
When I purchased the vehicle, the driver’s side mirror was broken.  The prior owner (PO) parked it on the street and, and on his street at least, careless drivers/vandals would break the mirrors on parked cars frequently.  Oddly, the PO had bigish driveway, so I was wondering why he just didn’t park the car there?  I also looked down the road to see many other cars parked on the street with all with intact mirrors. Maybe the mirror was broken some other way and this just seemed like the easiest explanation to a prospective buyer.  No matter how it got broken, in order to pass PA inspection, this needs to be fixed.

Hidden bolt
As far as repair jobs go, this was a breeze, no more than 15 minutes.  I used some nylon prying tools from HF to un-clip the interior, removed the wiring harness, and then I unwound the two 11mm bolts attaching the mirror to the door and then... something was keeping it attached. I pried a little and it didn’t feel like a clip.  So I got the new part and saw three studs and realized that I had one more bolt to remove in the forward section of the door and, after a little pressure to overcome a clip, the mirror was free.

Nylon, non-marring, prying tools
As you can see from the state of the tools, I find myself reaching for these little pry bars frequently.  Since they're soft plastic, they bend a little, making it harder to damage what ever you're prying and the blades don't scratch metal/paint and other surfaces.  They're stronger (haven't broken one yet!) than the look and feel too.

Electric mirrors (both driver and passenger) seem like standard equipment today, I haven’t seen a car equipped without them in I can’t tell you how long.  In fact, mirrors on both sides of the car weren’t always standard equipment.  I remember back in the early 90‘s getting a quote on a Honda Civic, that went something like this:

Sales Critter: So, you want side mirrors, right
Me: Yes
SC: Both of them?
Me: Uh... Yes?
SC: How about a radio?
Me: Sure
SC: And an antenna?
Me: (raises eyebrows)
SC: That’s extra. (scribbles numbers on four-corners sheet)

During the height of Honda-mania, it wasn’t uncommon to see base (DX) Civics without passenger’s side mirrors, the buyer trying to save a buck or feeling fleeced during the order-taking process that was buying a Honda at the time.  Electric mirrors were reserved for higher-level (LX) trim cars -- but I’m sure the dealers found a way to charge separately for them.

Ye olde timey mirror,
thanks www.yearone.com
There was a difference between “remote” mirrors and electric mirrors.  Remote mirrors were cable driven, electric mirrors were found on higher-end “fancy” cars.  Most of the time, the external mirrors rested on a ball and adjustments were remote in a different way: you told whoever was in the passenger seat to wind-down the window and supplied instructions.  For $500 in the late 80‘s/early 90‘s your beater didn’t have electric mirrors, but might have had cable operated remote mirrors, but most likely had something hand-operated.  I wouldn't be surprised if just the electric mirrors alone on an 90's vintage car added five Benjamin's to the price when new.

New mirror installed
Installing the new mirror was as easy as lining-up the studs, engaging the clip
and tightening the bolts.  The interior trim then snapped back into place. The part for this job cost about $60 from Amazon and it fit perfectly.  Done!

Tuesday, May 10, 2016

Interior


The interior is in excellent shape.  No rips, tears, holes...  What really impressed me was the how well

the seat fabric and cushions wore over the last 10 years/289K miles. I've driven rental cars that whose cushions seemed more pliant than a cheap hotel's mattress with 1/10th the miles on the clock.  These seats were firm and supportive, albeit a little dirty.  The dirt we can fix.  Cheaply.

Off to the Dollar Store (or maybe Family Dollar, or the Dollar Tree, or Dollar-a-Rama, but not Wal-Mart or Target, around my way I've never seen this product outside of a Dollarish store)  for two of my favorite cleaning products: LA’s Totally Awesome! Cleaner and Bang Bathroom & Shower Cleaner.  A buck a bottle.  

 These products live-up to their Awesome! names. They’re gentle, don’t leave a residue, no harsh smells, no streaks -- just spray wait a minute, and watch crud melt under its Awesome! power.    In under half a hour, the the worst of the surface crud was gone, taking some of the odor with it.

But the smell...  The plastic might have been covered with residual Le Brae levels of tar, but the fabric just soaks in the stink like a sponge.  With no more than a hand-held machine, I went over the seats and some of the carpet, removing sludge that makes used oil look clean.  I used “pet odor” cleaner in hopes what the machine couldn’t pull out would be broken down and be less odoriferous.

After a good scrubbing the car smelt like a freshly cleaned bingo hall -- complex floral notes balanced by the lingering unctuous scent of stale cigarettes (add some bleach undertones to make it smell like a freshly cleaned Catholic bingo hall).  For this my secret weapon: an ozone generator.   Not sure exactly how this works, other than it generates ozone and the ozone scares odors out of existence. Put this in the car for an hour, close the windows and doors, run the fans on recirculate.  The result is a car that smells like the smoking room of a mid-tier hotel.  Not great, but tolerable.

The headliner contains its share of smoke residue, no doubt, but cleaning that up will probably disturb the adhesive holding on the fabric and result in the liner dropping.  For now, we'll leave this alone.


Sunday, May 1, 2016

Oil leak solved

As advertised, our Freestyle leaked oil from the drain plug.  There's four possible problems:

1) Drain plug was loose
2) Drain plug threading on the pan was stripped
3) The pan was cracked or compromised around the drain plug
4) The leak was somewhere else and the oil adhered to the drain plug, making it look like the culprit

To get started, we need to look at the drain plug; so, out it came along with the oil.  As you can see, the drain plug is in good condition, it looks like at one point it was replaced in an effort t
Existing drain plug, threads look good
o remedy the problem.  Once oil dripping subsided, I threaded it back in and the bolt wouldn't tighten, so we have a problem with the threads in the pan.

Now that we know the problem, here are the possible solutions:

1) Fix threading on oil pan
2) Replace oil pan

A replacement oil pan with gasket and new drain plug would fix the problem, no doubt.  After 10 or so years, it's not unexpected for the gasket around the oil pan to erode and fail, so I might be fixing another problem yet to happen.  A new oil pan comes in at $240 (from rockauto), maybe fixing the threads is a viable option?

New, self-tapping drain plug,
notice the tapering
The easiest way to re-thread the existing hole would be using a slightly larger drain plug with the same thread spacing that's hard enough to cut into the pan's existing threading and make new threads.  It would also be nice if such a drain plug was slightly tapered, to make starting the cutting process easier.

Thankfully, such a thing exists at your local auto parts store: a self-tapping drain plug.  The plug also included a nylon washer improve the seal, but I could feel the new thread being cut and new new plug has seated firmly, making the washer redundant.

New drain plug, nestled snugly
in its new home, sans dripping!
The slow drip of the remaining oil in the pan provided a perfect cutting lubricant and, taking our time, the new bolt was lined-up and twisted into place.  Adding some oil, we found no leaking from the drain plug.  That fixes leaking due to reason 2 above.  Looking at the pictures, the gasket seal around the oil pan still might be compromised given the accumulation of oil or we could have leaking further up the engine.  Before setting the car down, the accumulated crud will be removed to make it easier to see leaking from other areas.  For now, until we see more leakage, the worst of the problem has been solved for about $4.

The stripped drain plug wasn’t entirely bad news.  It was a signal to me that the car endured many oil changes over its life.  Maybe the mechanics weren’t careful to properly tighten the bolt or maybe they did and the threads simply wore out.   When I removed the oil filter (more on oil later), it was properly tightened so odds are the drain plug was done correctly as well -- meaning that the threads simply degraded over time.  In any event, a high-mileage car with evidence of regular oil changes is better than one with an underused oil drain plug.