I paid $15,000 for our first house; purchased it from a family member who sold it to me as a way of evicting the current residents, who were, from my estimation, auditioning for "Hoarders: Buried Alive!" The house needed some work, with a good roof and and a functioning kitchen, I figured "why not?". To make the house habitable, I needed to empty it of several years of garbage (Who needs a garbage can? The floor's right there!), which required a dumpster. Before I could get a dumpster, I needed to clear the yard so the dumpster would fit, which meant I needed to clear the driveway so I dumpster could fit there to hold the flotsam from the yard. Getting the picture? No one "simple" task could be started, because several other things had to be done first.
My $500 car experience echoes my 15K house experience. Small tasks mushroom into multi-day projects as stuff just falls apart or has been mis-handled so that proceeding requires fixing a few additional things along the way. This makes any job unpredictable in terms of expense or time, as my CVT fluid change has shown.
This is the last installment of changing the CVT fluid, after a number of problems, I was able to get this done as well as replace the high-pressure filter. The biggest fly in the ointment:
a broken transmission cooling tube. As the photos clearly illustrate, the thick coat oil and road grime evidences a leak, somewhere, just not sure where, yet. When
replacing the water pump, I found what looked to be a
leaking camshaft seal, having replaced that, let's hope the remaining oil leaks can be handled through a quart between oil changes.
I'll Be Your New Transmission Cooling Line
 |
| New hose |
Nice and clean, delivered in just a few days from Tasca parts. I wasn't expecting to get so much additional hardware, as the line included a the mounting bracket holding the hoses to the transmission. The ends, covered by little red gnome hats have the additional o-rings, so I don't need to use the ones included in my oil change kit.
Removing the old line
 |
| Line looks to be leaking |
Since this was removed from the high pressure housing, most of the work of getting access and disconnecting the old lines was completed already. To access the refill plug and disconnect the old lines as part of a "normal" transmission service, the air intake and air filter box were already out of the way. There's a few electrical lines attached to the harness, so off they came, then two remaining 8mm bolts. Once those were off, I removed the lines from the cooler with my handy adjustable pliers — making sure I had a catch basin for the fluid still trapped in the radiator and the old line. No stripped or broke bolts. Not so bad!
Note the circled part, from where the metal line meets the metal hose, there's a large amount of oil and dirt accumulation. Maybe this is the source of the leaking in this part of the engine? I hope so.
Install New Line
 |
| Where the trouble began... |
I started the process at the high pressure housing, because I didn't want any damage to the mating surfaces. The bracket went back on the transmission, this was easy as there was really only one way for it to be positioned. Then the second fastener of the loop in the line and connecting the lines to the radiator. I used some adjustable pliers to release the tension on the clips and the dripping fluid from the radiator served as lube. Again... Not so bad. I must be getting better at this or I'm experiencing a great stroke of luck.
Refilling the Transmission
 |
| Measuring old fluid |
First, I measured the remaining fluid and used that to figure determine the amount for replacement. Measured 4 3/4 quarts, that's what I'll replace and check check the dip stick after going out for a drive or three and the fluid has warmed. I've captured a picture of the old fluid in a measuring cup, it rivals the muckyness of the
brake fluid. Doing a little reading, Ford does add some red dye to this fluid, you can see from around the rim how the fluid looks a bit rouge.
 |
| New fluid looks just a bit cleaner |
The new transmission fluid is a nice shade of honey, it doesn't look to be dyed any color. I happen to have one of those extended funnels, making adding the new fluid very easy. Not knowing how the fluid would flow into the case, I was careful to pour slowly and look where the funnel meets the case to watch for overflow. The transmission slurped-up all of the fluid as fast as I poured.
Square Drive, Imperial Measurement and ISO 1174
The transmission filler plug has a square 3/8 head. This is the same size as the drive head on a socket and, for a car with metric fasteners, decidedly out of place. Why not metric? This transmission, a ZF design, hails right from the heartland of metricness, so why pick something imperial-sized? This caused me to realize that no matter what the fastener type, the interface to the tool applying the force is complements of the Crown. Torx, Metric, English, TP3, ZXN? No matter what, these fasteners attach to to an 1/4, 3/8 or 1/2 inch square drive head on your ratchet. Why not 5mm, 10mm and 15mm interfaces to the sockets? The world has moved on to metric, except, it seems, for square socket drives. Or has it?
Somebody should know about drive socket sizing. I contacted the
Hand Tools Institute asking the the question, why are the drive sizes still imperial. The answer, yes people actually reply to my emails, was that they're metric, just "
soft conversions" from imperial measurements and that all this can be found in ISO 1174-1 for hand-driven sockets or ISO 1174-2 for power driven sockets. What we really have are 6.35, 9.53 and 12.7 square drive sockets conveniently labeled as 1/4, 3/8 and 1/2 inch. That means the 3/8in square drive for the transmission refill plug is really a 9.53mm sized square drive, labeled as 3/8in for convenience.
I was curious about the term "soft conversion" and doing a little more reading revealed that there's actually three types of conversion methods: hard, soft and adaptive. A hard conversion means changing the measurement when converting, for example a 1/4 inch fitting would be specified as a 10mm fitting. Adaptive means the measurements are approximations of each other, in this case a 1/4 inch fitting would be converted to a 9.5mm fitting. So, while "soft" conversion is least precise sounding, that's the opposite in practice.
All Done
 |
| After rust removal and a bit of paint |
All that was left was putting the transmission mount back on the car and replacing the inner fender. Recall the poor shape of the transmission mount. I removed the worst of the surface rust and with a little paint, it's in much better condition. The surface rust on the part didn't affect the performance or integrity, I'm hoping the little bit of extra effort keeps this part from becoming a problem for the remainder of the car's life.
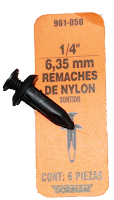
In the process of removing the inner fender, I broke the many of the plastic rivets holding it in place. I stopped down at my local auto parts store and found a pack of replacements for a few bucks. With these, I was able to re-secure the plastic inner fender and I was done. If I think I'll be doing more work on the car, I'll probably figure out how to order a bunch of these from Amazon, as I think I ended-up paying about $.25 for each and from the looks of the part, the markup was 10x. There's no reason why I couldn't get a bag of 50 on-line for just a few bucks more than I paid for six at a my local store.
Thanks,
ReplyDeleteI saved a lot of time and money from your tale. Every bit helps!