Monday, October 31, 2016

Happy Halloween! Fixing the Fan Speed Control

Boo!
The Freestyle has passed an important milestone in my household.  Not in dollars spent or miles driven, something more substantial.  My wife likes the car enough to start decorating it.  At first, she refused to be a passenger, in fear of an immediate breakdown or immolation (I feel the need to point out I spelled that word correctly the first try), but after seeing it not stranding me the last few months, I think she's warming up to our newest car -- plus, I think it keeps me in the garage and out of her hair.  I'm told this car is "cooler" than our minivan; which I don't understand because our minivan has a TV.

Fan Control

I'm on to fixing the AC system and part of the job is fixing something that didn't work from day one of my ownership experience: the fan speed control.  The controls offered two options: nothing or high.  Not a big deal, maybe an annoyance at the most.  Once the AC has been recharged (I've replaced all of the parts, just recharging the system remains!) it will be nice to have some control; same for the heat in the looming winter.

Replacing the part was easy enough.  On the passenger's side, slide the seat all the way back to give yourself room to work.  Then, remove a panel covering the fan by pulling out two plastic rivets:

The part in question can be found close to the firewall and center console.  Remove the wiring connector, spin out the 8mm screws.  The part will just fall out.

There's not much clearance and I found the wiring kept getting in my way, I tucked it into the center console.  Insert the new part, making sure it's oriented with the connector release facing you, the connector has some pegs to ensure a correct fit -- there's two screws and two alignment pegs -- twist things back up to "hand tight" and that's about it.  The wiring connector will fit only one direction and returning the protective cover involves pushing the plastic retainers back into place. Done!

The malfunctioning fan is a common failure, the part at fault being the fan speed resistor, which regulates the amount of electricity to the fan, which then controls how fast the fan spins.  This this part works by restricting the flow of electricity, that extra energy become heat, explaining why this component can be found close to the fan it controls, as that provides some cooling.  In this part of the world, something hot will condense the moisture out of the air, which probably contributes to the part's demise.

Old part, note bubbling
Coating the part with some moisture-resistant material performs the important job of keeping wiring on the part from making contact in such a way a short-circuit occurs, which looks like what happened on the failed part.  Notice the bubbling close to the connector, it looks like some water worked its way under the coating; guessing the heating and cooling cycles resulted in the coating separating from the sub-strait thus spoiling the circuitry.

A Small Find

Found the Owner's Manual!
When I removed the panel covering the fan, out fell the original owner's manual for the car and a black Aldi job application.  I'm guessing the book fell from an overloaded glove compartment above.  For the first time I think ever, I needed to consult the owner's manual to find the neutral override switch and needed to use Ford's (excellent) on-line manual service.  While I might never look at it again, It's nice having the owner's manual for completeness's sake.  I'll give the job application to my youngest kid so nothing goes to waste.

Thursday, October 27, 2016

Red Bentley

On my way over to Wal-Mart to get some provisions, and what did I see, but a Continental GT parked off by itself, so I decided to give it a little company whist shopping. 


While pulling into the spot, I realized that I didn't have the best idea of where the hood ended on my car.  I made sure I kept my distance between our bumpers and got this picture before heading into the store.

BTW: the AC is mostly replaced, we're in good enough shape to be on the road, lots of notes and pictures I'm organzing into a few upcomming articles -- learned more than I expected about AC systems.

Tuesday, October 18, 2016

Seat Handle


My Freestyle came with a broken seat recliner handle. The seat has motors to move it fore and aft, but reclining the seat is a manual affair in my trim level and the handle that did this was broken.  The recline of the seat was a bit more than I would have liked, I could have lived with it had I no choice, but I did have a spare $17 to put into additional driver comfort.

This seemed to be an easy fix -- get a new handle, push onto axle, call it a day.  Getting the new handle was the slightly more expensive than anticipated, as I couldn't find an after-market part via mail order that I knew would fit.  Even "hassle free" mail order returns seem to have some level of hassle.  

I would need to contact a Ford parts dealer, so I used my standby Tasca Auto Parts. Plugged in my VIN and a few clicks later, my order was placed.  A few days later, the part arrived at my door and I was even surprised the color matched.  Must have been color information encoded in the VIN, as I didn't make a color selection when picking the part.  I wouldn't have fussed about the color as long as it worked, but it's nice that it matches.

Worth noting that bag says "Majority Content made in USA".  Considering the bag contains one plastic, injection moulded part, I'm wondering what minority content was from outside the good-ol-USA.  This wording was probably carefully selected as a result several meetings at the legal department whose job it was to approve what appears on product packaging.


Here's the old and new parts.  The part broke in a predictable place given how it's used.  Installation was super easy, line-up the handle so the key was oriented correctly and press.  That's it.  I'm now much more comfy as I head down the road.

Tuesday, October 4, 2016

Aww, Snap!

So, my accessory belt broke again.  The first time the belt broke, I wrote the problem off to possibly the age of the belt.  It didn't seem unreasonable that the belt was not replaced recently considering the overall poor maintenance of the Freestyle.  When I replaced the belt, I didn't determine the root cause of the failure, I fixed the symptom, or second-order problem.

Belts fail due to the following reasons, and primarily the first two
  1. Age
    They're rubber + nylon, so after a while, the rubber and/or reinforcing material breaks down, causing the belt to come apart.  Belts in this state can be described as "crispy" as the rubber looses pliability.
  2. Pulley Problems
    The belt rides over a number of pulleys to transmit the force of the crankshaft to other components.  Problems such as poor alignment, wiggling (float), or a stuck (frozen) pulley will break a belt.
  3. Obstruction
    Stick + belt = broken. This is unlikely, but so is winning the lottery, and there's probably hundreds of lottery winners every day.

Proper Diagnosis

In my case, since the belt was new, #1 was ruled out, but number 2, well that's probably the problem.  I checked the pulleys before replacement, here's my findings:
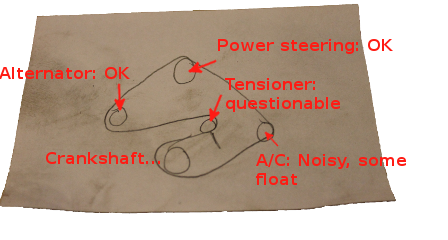
Annotated Belt Diagram
The tensioner pulley was as stiffer than an old man's back and the AC pulley was noisy and presented some float.  Float, in this sense, is when a pulley moves perpendicular with respect to its axle.  I decided to take a chance a replace the tensioner: firstly, it was cheap (sub $10) and considering it looked the age of the car, I wasn't surprised it wasn't rolling quietly and smoothly.  The next possible problem would be the A/C pulley, the float causing the belt to be incorrectly aligned and come-off the pulley, but that would be considerably more expensive, so lets start with the cheap fixes first. 

Replacing the Tensioner Pulley

Lots of room to remove part
I put the car up and removed the inner wheel lining to get easy access to the tensioner, held to the engine with one 13mm bolt.  I was expecting a struggle, with a very tight bolt, affixed with a double-dose of blue Lock-tite.  A good pull on the ratchet and that was it! I removed the rest of the bolt with my fingers -- almost too easy.  The part then just fell off into my waiting hands.
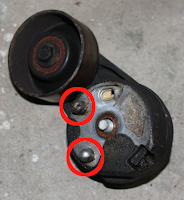
There's two other pegs (circled) on the tensioner to hold it in place, once mounted to the engine. This is neat design in that the tension cannot be incorrectly mounted and, at the same time, can be held in place with just one bolt, saving assembly time. 

As with the rest of the engine bay, the part was covered in oil.  I'm sure that I'm leaking from the valve covers, and/or the cover over the timing chain and/or the camshaft seals.  More leaks than an onion farm.  As long as I don't have a puddle in my driveway, that's a problem for a different day.
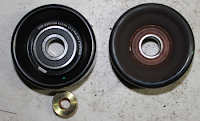

New (l) and Old (r)
Once off the car, I cleaned the existing part, removed the old pulley by removing the 8mm bolt and swapping parts.  My new part included a small adaptor for applications where the part rested on a smaller axle. I'm guessing this part works on umpteen different cars and the cost of a little ferrule in every box is cheaper than maintaining two different SKUs.
Reassembled and much cleaner

Re-assembled and the part was ready for re-installation.  Considering how easy this change was to do, I should have done it when replacing the belt the first time around. 

I'm happy that I took pictures as I went along, as I didn't know in which direction to install the new pulley -- but since I had a picture of the part right after removal, knowing what to do was easy.

Rattling Continued until it Stopped

Installed the belt, nothing notable there.  Fired-up the engine and it ran just fine.  But the A/C pulley was still rattling.  Figured this was OK, drove the car for about a week and the A/C pulley became louder, developing into a legitimate, full-blown racket.  The noise finally went away when the replacement belt broke, so I know what needs to be done to fix the root cause of the problem.  I've never done any work on an A/C system, so this should be a learning experience.